Complete guide on 2D medical image annotation in Supervisely

Learn how to annotate DICOM, NRRD, NIfTI medical images in 2D with efficient collaboration, CT / MRI windowing and AI auto-labeling.
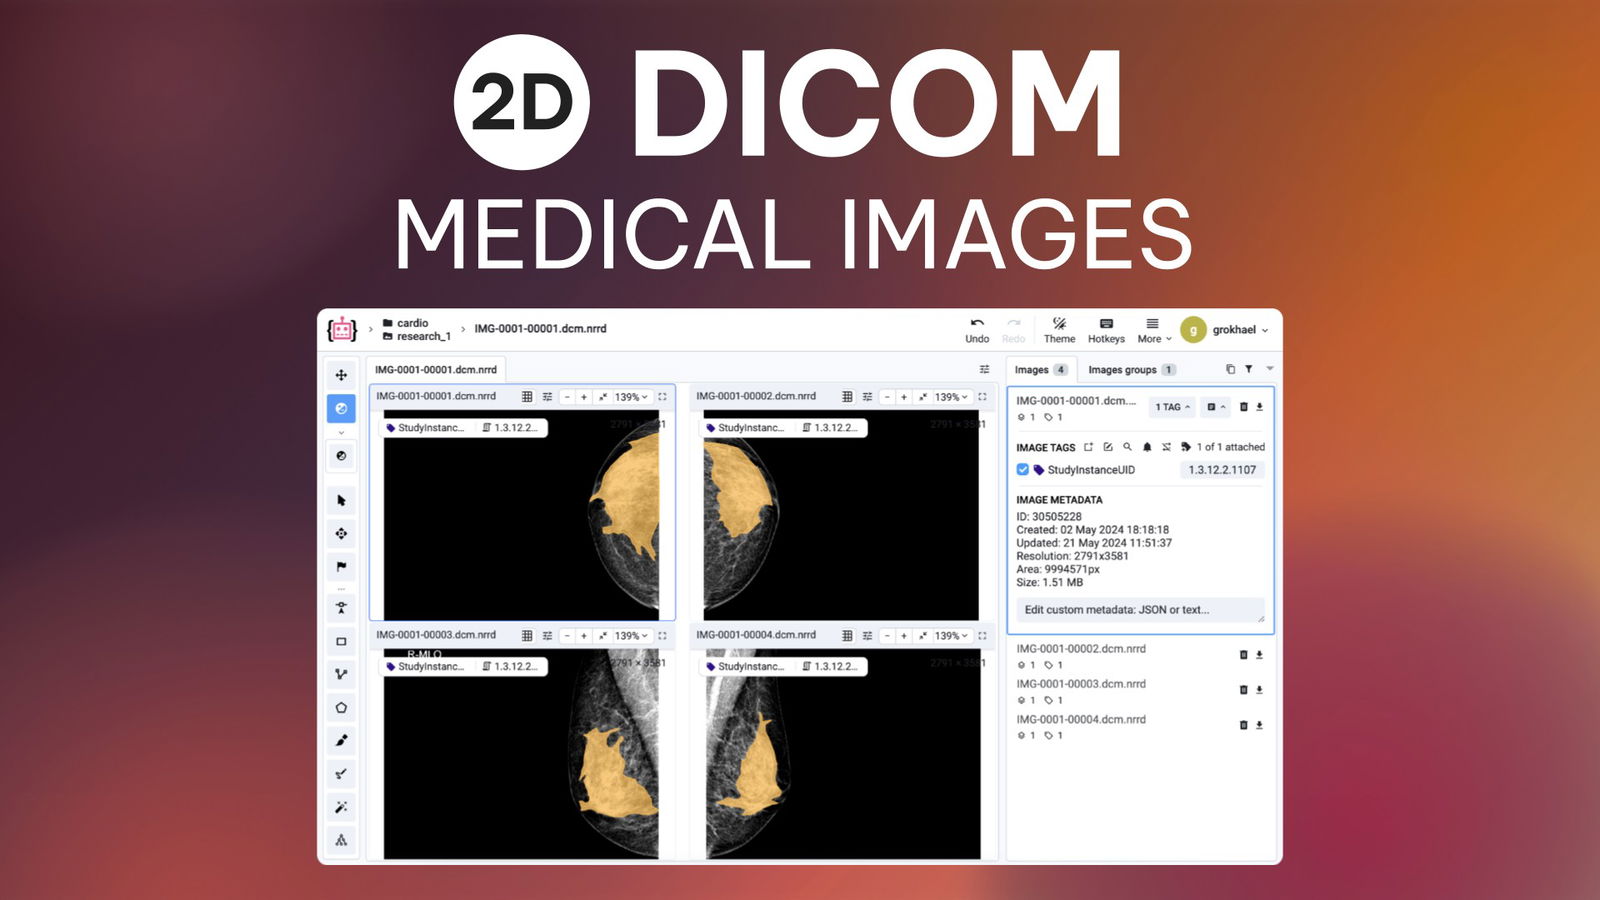
Table of Contents
Introduction
In this tutorial, we will show how to import and annotate 2D medical images in various formats like DICOM, NRRD and NIfTI in Supervisely. We will also demonstrate key features, such as the Multi-View mode and advanced windowing, to enhance the visibility of structures in medical images.
In one of our previous blog posts, we learned how to annotate 3D DICOM volumes from CT and MRI scans in Supervisely. However, we haven’t explored the scenario involving 2D DICOM images. Let’s delve into it.
The labeling process of 2D medical images includes use cases where it is needed to annotate a single image or multiple images at once. Annotation of several medical images shown on the screen at the same time could be considered a special case of multi-view image annotation. This is because your medical images can be grouped by a specific tag, such as StudyInstanceUID, SeriesInstanceUID, or others, allowing you to view and annotate multiple images simultaneously.
 Single-view and multi-view modes
Today, based on the example of mammography images, we will show:
-
How to import medical images in DICOM, NRRD or NIfTI formats.
-
How to work with single image and multi-view image annotation.
-
How windowing of 2D medical images works.
-
How to annotate 2D medical images.
-
How to export labeled data.
Use cases of medical image labeling
2D DICOM (Digital Imaging and Communications in Medicine) medical images are a crucial component of modern healthcare, facilitating a variety of clinical and research applications. Here are some potential use cases:
-
Cardiology: 2D DICOM images of the heart help cardiologists assess cardiac function, detect valve problems, and diagnose heart disease. Moreover, it is used to visualize the blood vessels of the heart to diagnose blockages or other vascular conditions.
-
Oncology: Regular 2D DICOM imaging allows oncologists to monitor the size and progression of tumors, helping to evaluate the effectiveness of treatments. From the point of radiotherapy planning, accurate imaging is crucial for scheduling the precise delivery of radiation to cancerous tissues while sparing healthy tissues.
-
Orthopedics: Orthopedic surgeons use 2D DICOM images to diagnose and plan treatments for fractures, dislocations, and joint degeneration.
-
Dentistry: Dental X-ray images are used for diagnosing cavities, tooth root conditions, and other oral health issues.
-
Radiology:
-
X-rays, CT Scans, and MRIs: Radiologists use 2D DICOM images from these modalities to diagnose a range of conditions, from fractures and tumors to internal bleeding and congenital abnormalities.
-
Mammography: Mammography images (a.k.a. mammograms) are low-dose X-ray images that can detect breast cancer in its early stages by recognizing different abnormalities, such as tumors, cysts, breast calcifications, and other changes in breast tissue.
-
Video tutorial
In this video we demonstrate how to get most of the 2D medical images annotation tools in Supervisely. You will learn how to label DICOM, NRRD, and NIfTI medical images in 2D with efficient collaboration, CT / MRI windowing.
How to label DICOM images in Supervisely
In this tutorial, we will cover the main steps on how to import, annotate and work with medical images. Why Supervisely is different? Existing solutions for working with medical images, like MITK or Slicer3D are great for research purposes, where just one or two experts perform annotation. However, they are not designed for production use cases that require the collaboration of large teams such as annotators, domain experts, managers, data scientists, data engineers and developers.
The full-stack Supervisely Computer Vision platform is a web-based solution that covers all steps of the Machine Learning workflow. This includes medical data annotation, efficient collaboration and data organization, and integration with modern Neural Networks toolboxes. Additionally, it provides other enterprise-grade features with a strong emphasis on security, integration with other products like 3DSlicer, and customization.
Supervisely Labeling Tools allow you to organize labeling process efficiently and annotate objects of interest in an advanced manner, facilitating the collaborative efforts of multiple annotators within a single project. Moreover, it is possible to establish a Job hierarchy by using such labeling roles, as Manager, Annotator, and Reviewer. For more detailed information, please refer to our user guide or the blog posts about Labelling Jobs and Labelling Queues.
Step 1: Import 2D DICOM images
In our case, there are two options for 2D DICOM images import in Supervisely:
-
Option 1: Use our Import Wizard to create a new project with 2D medical images in the required format. It supports
.nrrd/.dcm/.niidata formats. For DICOM images, the grouping tag will be chosen automatically.It is important to select the
Medical 2Doption in the Import Wizard to ensure that the data is imported correctly. The Auto Import application will automatically detect the data format, create a project with the appropriate settings, and upload the data.Steps for creating a new 2D DICOM project -
Option 2. Use the Import DICOM studies app.
 Supervisely App
Import DICOM studies
Creates project with images grouped by selected metadata, converting DICOM data to NRRD format in the process.
To make the process 100% clear, let's consider the file structure of the project without annotations:
📂 cardio
┗ 📂 research_1
  ┣ 🩻 IMG-0001-00001.dcm
  ┣ 🩻 IMG-0001-00002.dcm
  ┣ 🩻 IMG-0001-00003.dcm
  ┗ 🩻 IMG-0001-00004.dcm
We've prepared 🔗demo data to help you quickly follow the tutorial.
In the modal window, select the grouping tag from the list of predefined tags, or choose the tag manually.
How to run the "Import DICOM studies" application
💡 You can always ungroup the images by disabling Group Images mode in the project settings.
That's it! You have successfully imported your 2D DICOM images into the Supervisely platform. Now, let's move on to the next step.
Step 2: Adjust the images with windowing
DICOM is an international standard for medical images, such as X-rays, CT scans, or MRI scans. Such images often contain a wide range of pixel values that represent different tissue densities or intensities. These pixel values can span a large dynamic range, making it challenging to perceive details in both the darker and brighter areas simultaneously.
To do so, you can use a special windowing tool on the left instrument panel. Windowing involves selecting a range of pixel values and mapping those values to the full range of display intensities.
Supervisely offers a broad variety of different presets that window different human tissues. In our case, you can choose Mammary Gland preset or specify the Window Width (W) (contrast) and Window level (C) (brightness) manually by holding the left-click of your mouse and adjusting the parameters.
But what do those parameters mean on a substantial level? Move to the Exploring Mammary Gland windowing preset section to see an example.
Step 3: Annotate 2D DICOM images
After windowing, identifying the target structure for annotation becomes straightforward.
You can use various tools:
-
Polygon, Brush, and Mask tools are used for annotating Polygon shapes on planes if you don't need much precision (f.e. breast).
-
It's convenient to use the Bounding Box (Rectangle) tool if you only want to mark an object without defining its outline.
-
The Polyline Tool is useful for masking the narrowest tissues.
-
Smart Tool helps you easily label the desired object in an image with just a few clicks because it is based on using various pre-trained neuron network (NN) models. All you need to do is frame the presumed object with a bounding box. You can run multiple models simultaneously for different input data and quickly switch between them. Also, you can always serve your own trained model. Check our blog post for details.
Step 4: Export annotated data
You can easily export your annotations in Supervisely JSON format.

At any moment, you can simply reimport your data back to the Supervisely platform using Import DICOM studies app. To preserve the grouping, you need to export and import the data in the Supervisely format. Learn more about the Supervisely JSON format.
Optional: How to activate the Multi-View mode in an existing project
If you have an existing project and want to activate the special labeling interface mode for grouping images, you can instantly group the images by tag with the Multiple Images Views Mode. To do so, activate the mode in the More menu - this will group images only for the current session.
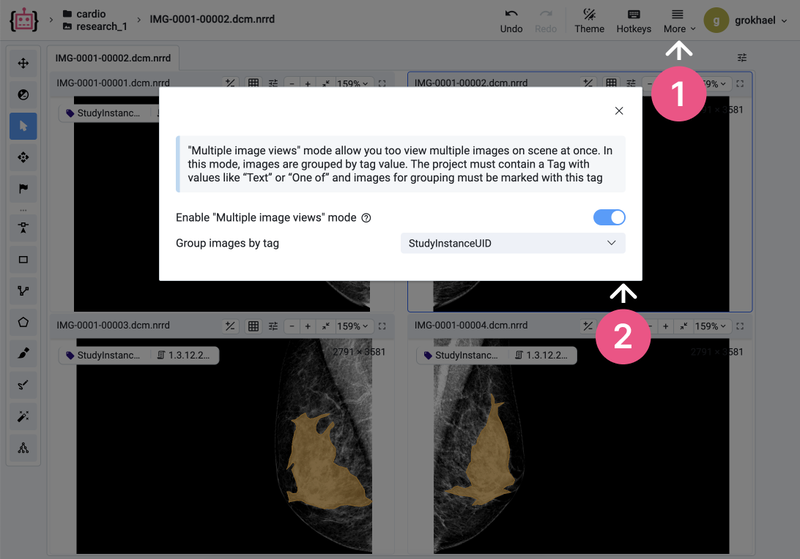 Choose multi-view mode
To preserve changes and group projects by tag, go to the project settings:
Settings ➭ Visuals ➭ Project labeling interface ➭ Medical 2D and click Save to apply the changes.
Also, you can choose the Group Images sync mode to simultaneously annotate images.
 Group settings
Easy integration for Python developers
Use supervisely package to explore the potential of its API:
pip install --upgrade supervisely
You can learn more about it in our Developer Portal, but here we'll just show how you can upload your image groups with just a few lines of code.
images_paths = ['/path/to/IMG_001.dcm', '/path/to/IMG_002.dcm']
images_metas = [{'YourMetaData':'Val01'}, {'YourMetaData':'Val02'}]

# upload 2D DICOM images
api.image.upload_medical_images(
    dataset_id, images_paths, "GroupTagName", images_metas
)
In the example above, we uploaded two DICOM files with the specified tag name. The images_metas parameter is an optional list of dictionaries with metadata for each image. By using the api.image.upload_medical_images method, you can easily upload your DICOM images and group them by one of the specified or default tags.
All metadata from DICOM will be automatically preserved after image upload and will be available in the Labeling tool in the IMAGE METADATA section.
Our Python SDK offers extensive capabilities for working with these images! You can access a variety of Python SDK tutorials on our Developer Portal to learn more.
Appendix A. Understanding tags
As you may already know, the grouping of images occurs due to the presence of a predefined group tag. However, you have the flexibility to group images based on any other tag of your choice or even create custom tags.
To create a new tag, navigate to the corresponding tab on the dataset page, and simply create a new tag. In the Images and Objects sections, you have the option to attach a tag to either a specific label or the entire image. And yes, you can utilize a custom tag to group your images as needed.
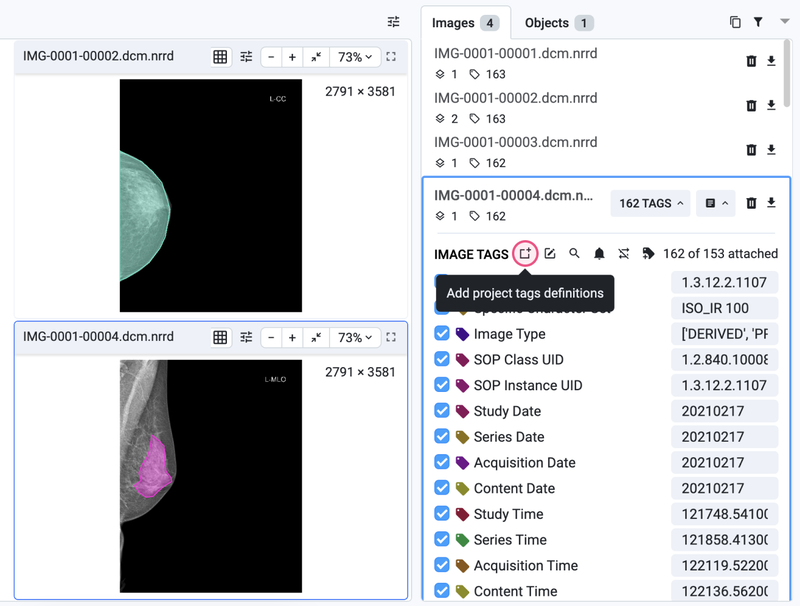 Create new tag
Appendix B. Exploring 'Mammary Gland' windowing preset
As you can see, there are various presets available for the Window Width (W) and Window level (C) parameters, which correlate image properties with different medical tissues. Let's consider the Mammary Gland W: 1500, C: 1700 preset as an example.
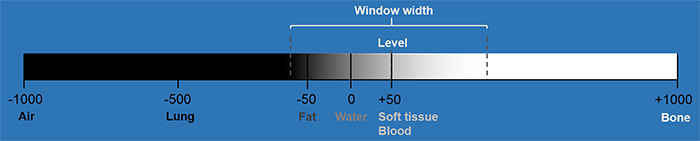 Example of the windowing scheme
The Window Width (W) defines the range of pixel values that will be mapped to the full display intensity range. In this case, a window width of 1500 indicates that a range of 1500 pixel values is utilized for visualization.
The Window Level (C) represents the central pixel value within the selected window width. It determines the brightness or intensity level of the image. With a window level of 1700, the central pixel value of 1700 serves as the reference point for mapping pixel values to the display.
By appropriately configuring the window width and window level for the mammary gland, the image can be adjusted to enhance contrast and improve the visibility of mammary gland structures.
Summary
This tutorial has covered the most crucial aspects of working with 2D DICOM images. However, the Supervisely platform offers an array of captivating features that can greatly enhance your labeling experience. To explore these powerful tools, we encourage you to delve into our comprehensive DICOM 3D annotation toolbox guide or explore other tutorials in our blog. Stay tuned for more exciting updates and enhancements!
Supervisely for Computer Vision
Supervisely is online and on-premise platform that helps researchers and companies to build computer vision solutions. We cover the entire development pipeline: from data labeling of images, videos and 3D to model training.
The big difference from other products is that Supervisely is built like an OS with countless Supervisely Apps — interactive web-tools running in your browser, yet powered by Python. This allows to integrate all those awesome open-source machine learning tools and neural networks, enhance them with user interface and let everyone run them with a single click.
You can order a demo or try it yourself for free on our Community Edition — no credit card needed!
Liked this blog post? Share it!


Subscribe to new blog posts
Table of Contents
🤖 Try Supervisely: it's free!
Full stack platform with hundreds of Apps ready to solve any computer vision task: from labeling to model training. Create account


