Labeling Queues: Streamline Your Labeling Pipeline

Discover the optimal approach for annotating and structuring large-scale data labeling tasks with using Labeling Queues and following our step-by-step guide.
Table of Contents
Introduction
Continuing our discussion on Сollaboration at scale, let's move on to a tool called Labeling Queue that greatly simplifies annotation of big datasets by a team.
In the previous post devoted to Labeling Jobs, we've already discussed the importance of coordinating team efforts and effective collaboration.
In this post, we will discuss effective strategies for managing labeling tasks within extensive teams and handling substantial volumes of data to maximize efficiency and minimize time spent using Labeling Queues.
Watch our 5-minute video tutorial on how to use Labeling Queues within the Supervisely platform.
What are the Labeling Queues?
Labeling Queues is a systematic method for distributing and managing labeling process in a team, where labeling tasks are grouped into queues and sequentially distributed among annotators. The essence of this system is that the data is not distributed between annotators, but is issued from a common queue (pool) of tasks, on a "whoever labels first" basis, until there is no more data to label. This allows to balance data annotation process within the labeling team independently of the speed of individual workers.
It's a valuable tool for optimising and coordinating the annotation of large image datasets within teams. In Supervisely, Labeling Queues are currently available for images only.
How Labeling Queues work in Supervisely
In Supervisely Labeling Queues are based on Labeling Jobs and work as follows:
- Currently Labeling Queues operate on the entire Dataset.
- When a Labeling Queue is created, an empty Labeling Job for each labeler and Reviewer is initiated.
- As the Annotators access these Jobs through the labeling interface, they retrieve the next available un-annotated image in the dataset from the queue. This selected image is then allocated as a task for the Annotator. Upon pressing the
Confirm and pull nextbutton, this process seamlessly repeats. One of the key features of Labeling Queues is that the Labelers aren't required to complete the entire batch of images before sending them for review. - Reviewers have the flexibility to access their reviewing tasks at any moment. If available, annotated images are retrieved from the queue for the review. Importantly, this reviewed images does not revert to the general pool of images for annotation. Instead, it is promptly incorporated into the Labeling Job of the Annotator who initially labeled them. This implies that the Annotator can gather several images within their assignment that have been recently selected from the shared queue.
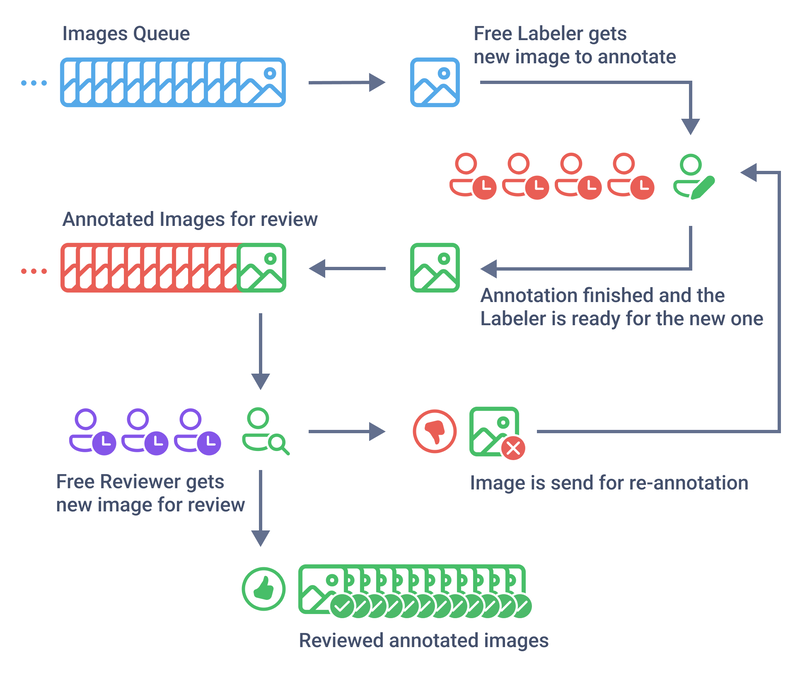 Labeling Queue mechanism
Let's look at key benefits of using Labeling Queues:
-
Time saving and user-friendly: There is no need to create individual Labeling Jobs for each project. With Labeling Queue creation, you can save time by eliminating the need to repeatedly configure Labeling Jobs for new projects and reassign them to your team.
-
Scalable and adaptable: The Labeling Queueing system is adaptable to changing project needs and team makeup. You can easily remove unnecessary Labeling Jobs, switch team members during annotation, adjust Labeling Job's settings, and scale the annotation process as required, such as reassigning annotators to different projects.
-
Result-oriented approach: Labeling Queues system ensures even data distribution among annotators, minimizing downtime and speeding up project completion. It emphasizes results over individual team member contributions.
-
Efficient Project Management via the common queue of data: Each team member may work at their own pace, which can affect project progress. The Labeling Queues approach effectively solves this issue by creating a shared data pool. This simplifies management tasks and ensures that annotators' work speed doesn't hinder project advancement.
How to use Labeling Queues in Supervisely: Step-By-Step Guide
Before you start, make sure that you have:
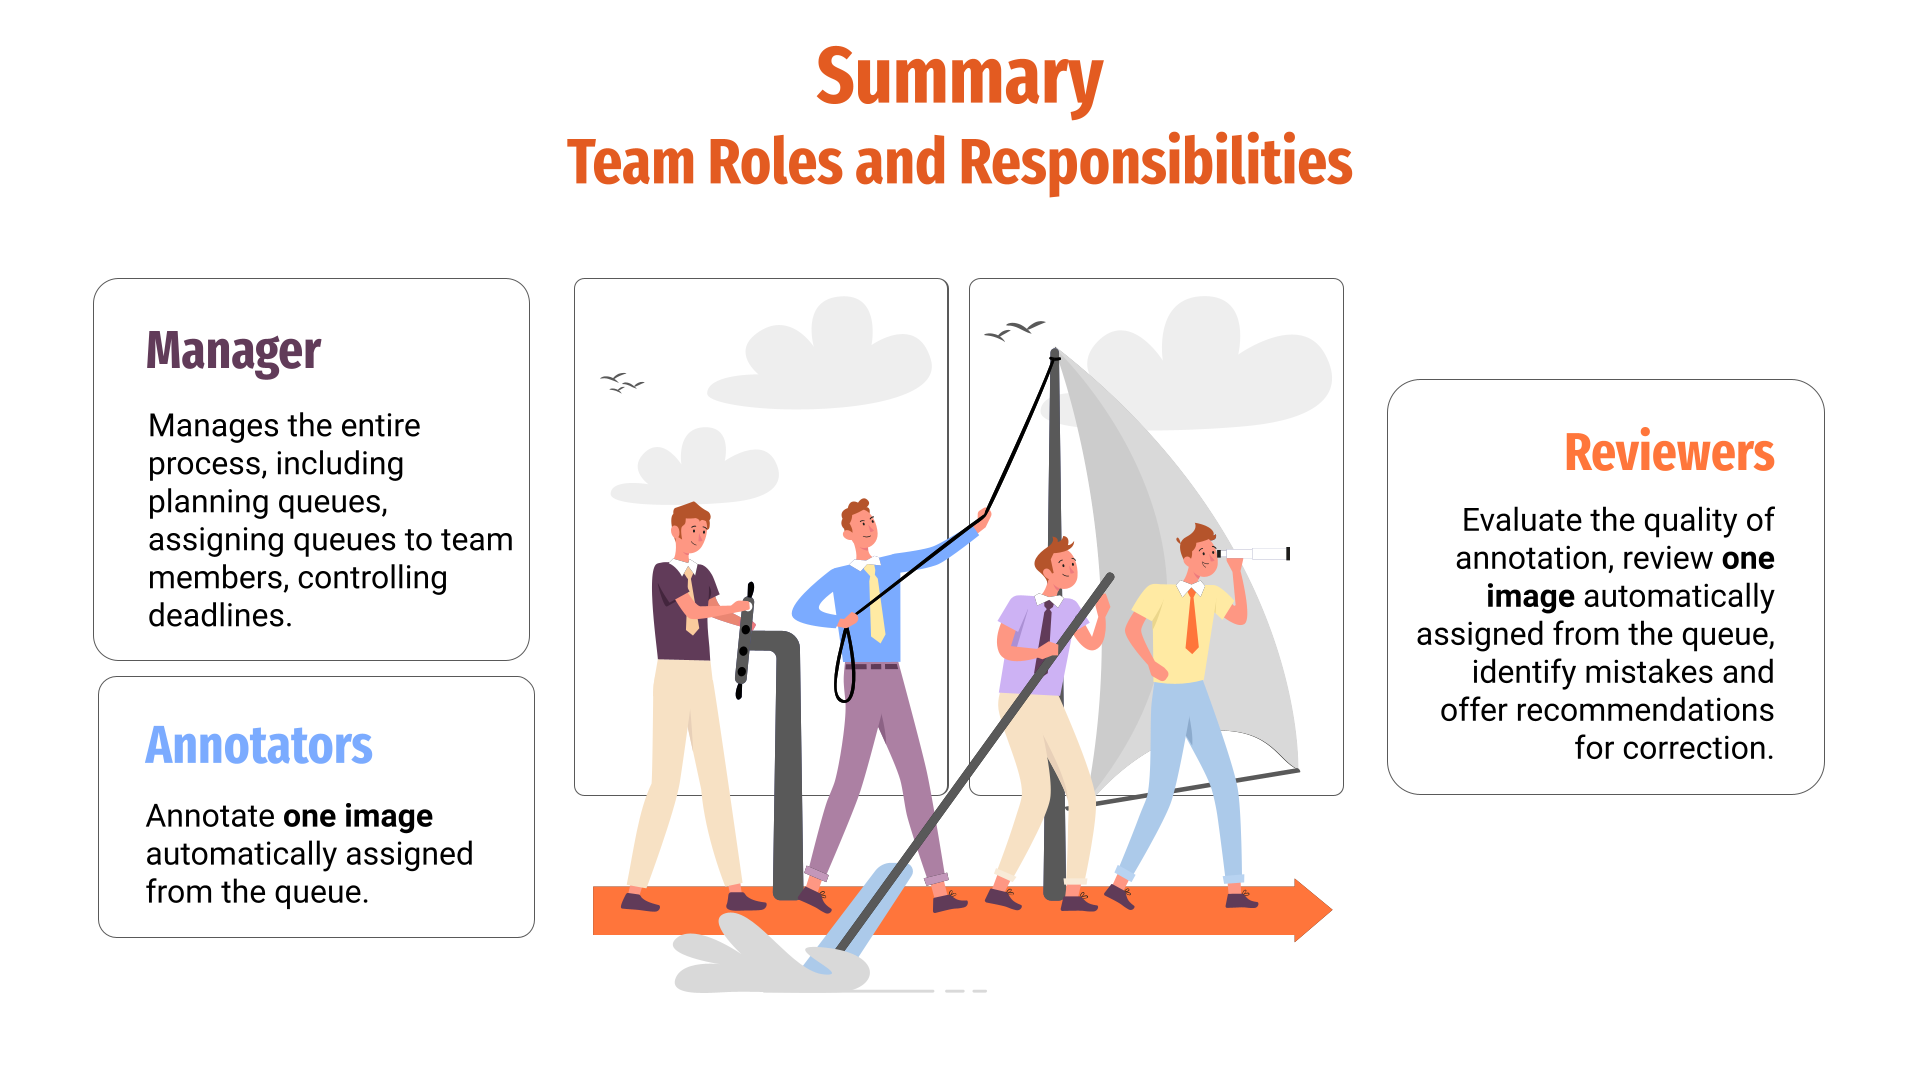
- A dedicated team assigned with proper roles. To learn more about roles, refer to our post devoted to Labeling Jobs, which provides more detailed information about the functionality of each role.
- Necessary projects for annotation with relevant properties (classes, figures, or tags) defined.
The following example will show you how to use Labeling Queues:
Suppose you are the owner of a project whose goal is to train a deep learning model to recognize strawberries in images. You have 10,000 images of strawberries for annotation. In order to do that efficiently, you may rely on Labeling Queues functionality following the below steps.
Step 1. Create Labeling Queues
First of all, the Manager or Reviewer creates the Labeling Queue with defined criteria and assigns Annotators to perform the labeling and Reviewers - to verify the labeling. Consequently, an empty Labeling Job is created for each labeler and reviewer.
Upon completion of the Labeling Queue setup process, creators are redirected to the Labeling Queues page, which displays a queue containing Labeling Jobs for Annotators and Reviewers. The queue includes Labeling Jobs, which are automatically created for each Labeler and Reviewer.
Step 2. Image Annotation
In each Labeling Job, Annotators are given one image at once for annotation according to the instructions provided. Labelers are not obligated to finish the whole batch of data before submitting it for review. A new image is assigned to an Annotator only after the previous image has been fully annotated and sent for review. So, Annotators capable of annotating 5 images per minute can provide support to colleagues who can only annotate 1 image per minute.
This process continues until all images are annotated by all Annotators, or until there are no more images to annotate.
Step 3. Review and Quality Control
Annotation results are sent to Reviewers for verification. Reviewers receive review-images sequentially and check the annotation for accuracy and compliance with instructions.
Reviewers can access their reviewing tasks whenever necessary.
If the annotation is correct, they approve it. If errors are found, the image is sent back for re-annotation to the same Labeler. It's crucial to note that these reviewed images does not return to the general pool of images for annotation. Instead, it is promptly integrated into the Labeling Job of the original annotator.
Once the Labeling Queue is finished, you can analyse the results in statistics, export data and create a training dataset and use it to train a model that can recognise strawberries in the images.
Labeling Queues Statistics
📊 Manager and Reviewer can view statistics for each Labeling Job in the Labeling Queue by clicking Stats button.
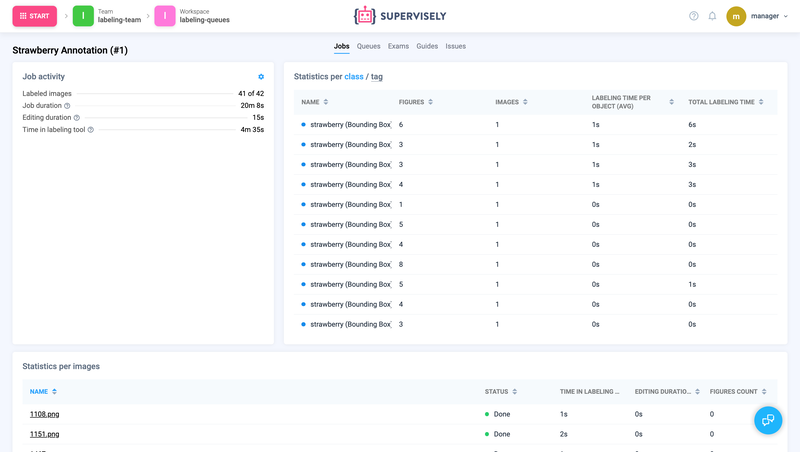 Labeling Job statistics
Export
You can choose to obtain activity data from either a Labeling Job or a team member in the form of a .csv file. Besides, you can easily export approved images from the dataset in Supervisely format after completing the Labeling Job review.
Export Items After Review
Export items after the passing labeling job review

You can find and apply more applications on the Collaboration at Scale topic in the Collaboration section of Supervisely Ecosystem.
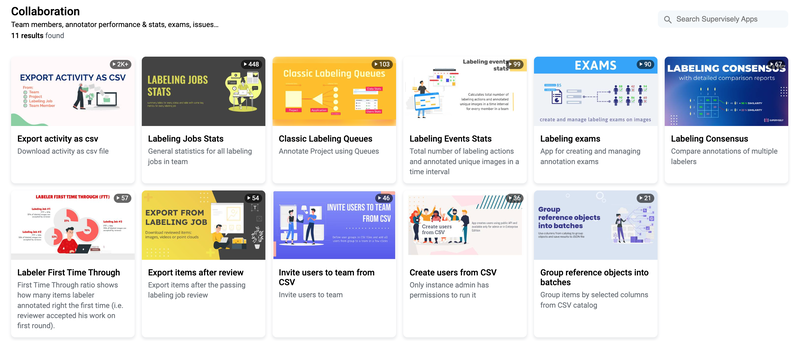 Additional Applications
Conclusion
With the help of Labelling Queues, data annotation teams can achieve higher productivity, reduce time delays and improve quality of work, which is especially important when working with large datasets. This structuring method makes the work of managers much easier and empowers data annotation teams to substantially boost their efficiency and effectiveness, leading to reduced project timelines and superior work quality.
Supervisely for Computer Vision
Supervisely is online and on-premise platform that helps researchers and companies to build computer vision solutions. We cover the entire development pipeline: from data labeling of images, videos and 3D to model training.
The big difference from other products is that Supervisely is built like an OS with countless Supervisely Apps — interactive web-tools running in your browser, yet powered by Python. This allows to integrate all those awesome open-source machine learning tools and neural networks, enhance them with user interface and let everyone run them with a single click.
You can order a demo or try it yourself for free on our Community Edition — no credit card needed!
Liked this blog post? Share it!


Subscribe to new blog posts
Table of Contents
🤖 Try Supervisely: it's free!
Full stack platform with hundreds of Apps ready to solve any computer vision task: from labeling to model training. Create account


