
How to Use 3D Slicer With Supervisely for Medical Annotation
 Sergey Sych
Connect 3D Slicer to Supervisely labeling jobs: install the extension, annotate and review CT and MRI volumes, and keep your team's workflow in one place.

To use 3D Slicer with Supervisely, install the ConnectToSupervisely extension from the Slicer Extension Catalog, log in, and open a labeling job from the platform. You annotate or review volumes in 3D Slicer, then submit them back, so your team keeps jobs, roles and review in Supervisely.
What is the 3D Slicer integration for Supervisely?
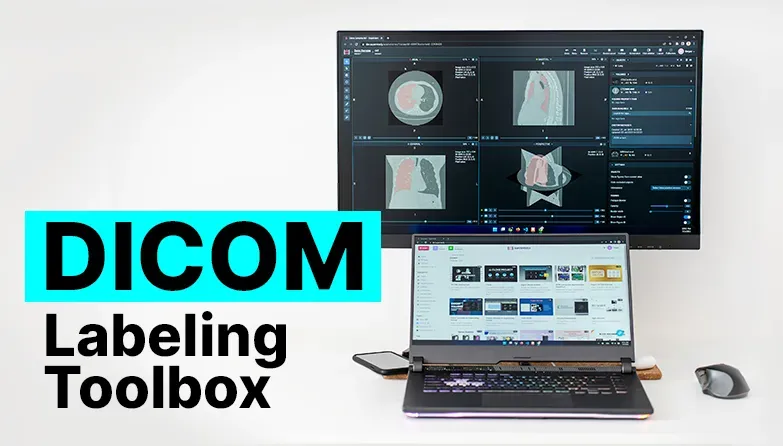
Supervisely has a medical labeling toolbox for DICOM, NRRD and NIfTI. Teams organize work through Labeling Queues or Labeling Jobs, which cover data preparation, pre-labeling, annotation, change tracking, activity logs and workforce statistics. This matters for CT and MRI, because the time of doctors is limited and expensive. The DICOM labeling docs describe the tool.
Some data workflows need other tools. For those, Supervisely integrates with 3D Slicer, open-source medical software for analysis and visualization of 2D and 3D medical images.
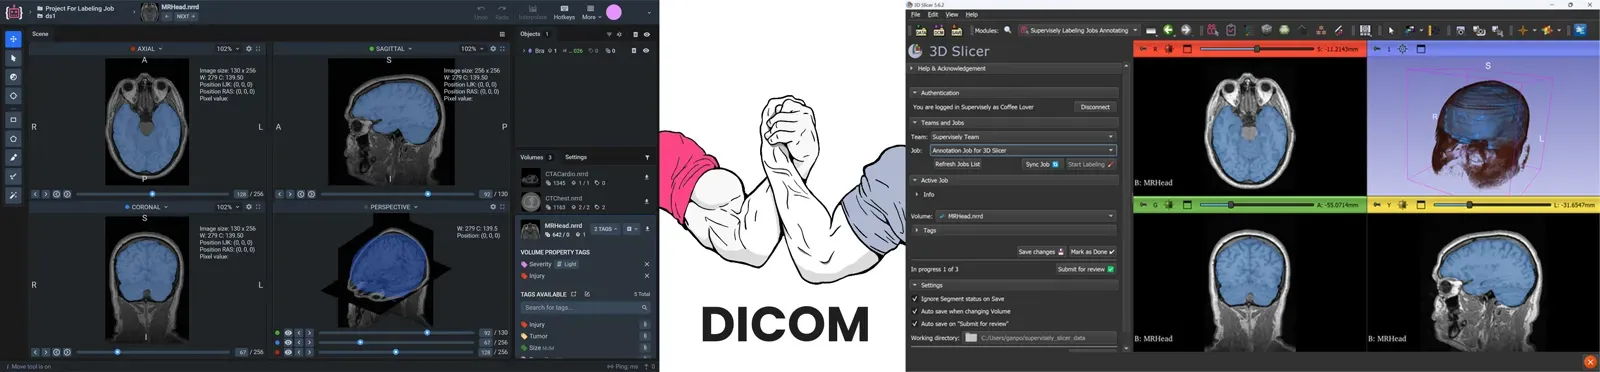 3D Slicer and Supervisely interfaces side by side
For more, see our guide to the Medical Annotation Toolbox and the 5-minute quickstart video tutorial on YouTube.
Is there a video tutorial for the integration?
Yes. This 8-minute video covers the most common pipeline for medical data:
- Workspace and data preparation with team organization.
- Creating a Labeling Job.
- The ConnectToSupervisely extension and its modules.
- Switching between the application and the web interface: start annotating in Supervisely, switch to 3D Slicer for 3D editing, then return to the web interface to complete the task.
Why use 3D Slicer with Supervisely?
3D Slicer is supported by an international community of users and developers with deep medical expertise. It was not designed to cover end-to-end computer vision workflows, so some functionality is missing. Supervisely adds:
- Work in a web browser. If a device has no 3D Slicer, log in to Supervisely and edit data there.
- Organization of annotation for a large team of ML specialists and domain experts.
- Collaboration: user permissions, access control, external authorization (SSO, OpenID, LDAP), labeling and review tasks.
- Several users annotating the same data at once, for consensus labeling.
- Activity and performance tracking for annotators.
- More export formats for training data.
- Other annotation tools often needed in computer vision projects, such as tags and attributes.
- Cloud storage support, so data is not only stored on annotators' computers.
- Machine learning tools and neural network toolboxes for model training and pre-labeling.
| 3D Slicer alone | 3D Slicer with Supervisely | |
|---|---|---|
| Where data lives | Local files on each computer | Platform storage, in the browser or in Slicer |
| Team workflow | Not built for end-to-end computer vision workflows | Labeling jobs with annotators and reviewers |
| Access control | Local application | Permissions and SSO, OpenID and LDAP |
| Annotation tools | Segment Editor and Slicer modules | Slicer tools plus the web DICOM toolbox |
When to use 3D Slicer vs the Supervisely DICOM toolbox?
Use both in one job. 3D Slicer has evolved for many years and has many niche annotation solutions and visualization tools. Supervisely supports DICOM and other popular medical formats, and the annotation objects are 3D mask volumes, so 3D Slicer can work with this data directly.
| Situation | Better fit |
|---|---|
| No device with 3D Slicer, or you only need to view or edit data | Supervisely in the browser |
| Quick first mask, for example a lung | Smart Tool in the Supervisely labeling tool |
| 3D editing, niche modules or Slicer's visualization tools | 3D Slicer with the extension |
| Many annotators, roles, review and activity tracking | Labeling Jobs, from either tool |
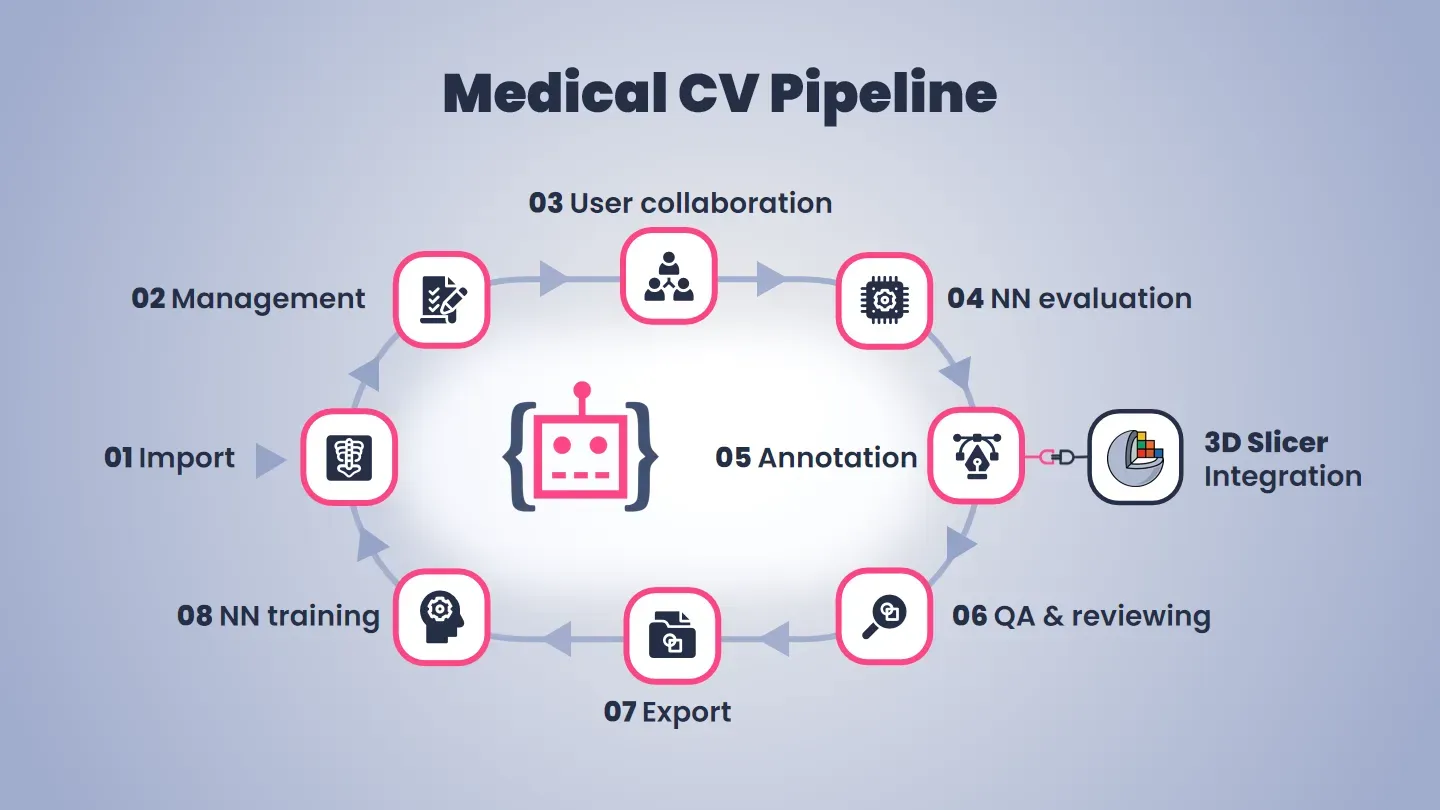 An example of the most common pipeline for working with medical data.
Supervisely adds AI-powered and automation tools that speed up labeling of 3D volumes.
How to use 3D Slicer with Supervisely step by step?
Supervisely released the ConnectToSupervisely extension for the 3D Slicer Extension Catalog. To use it:
- Import data and prepare the workspace: create a project, import data, invite annotators.
- Create a Labeling Job and assign it to annotators and a reviewer.
- Install the extension in 3D Slicer.
- Open the extension module and log in to Supervisely with the account that has the task.
- Select the Labeling Job, click Start Labeling, annotate and submit the result to Supervisely.
- Review the annotations in the reviewing module.
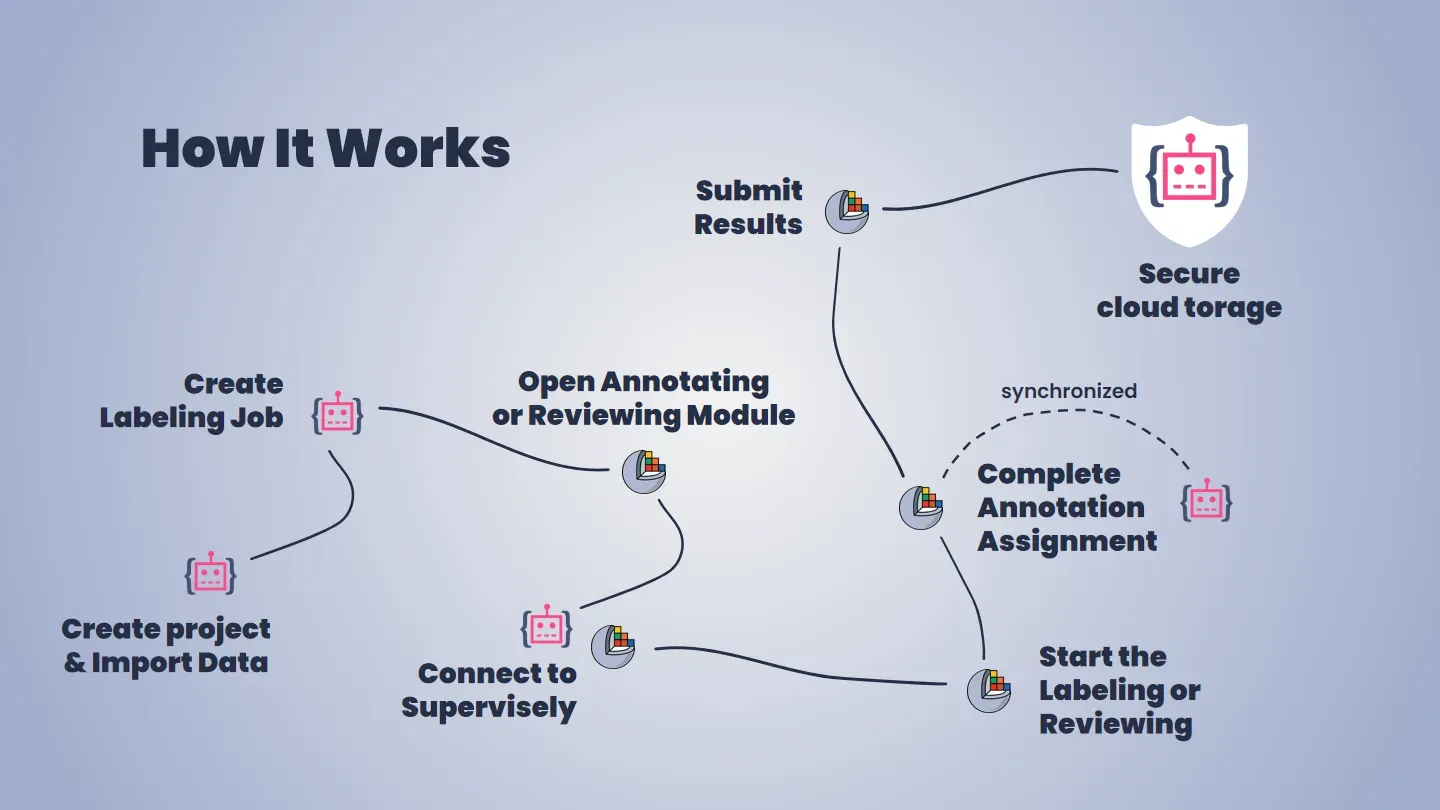 ConnectToSupervisely extension module workflow
The extension has two modules:
Labeling Jobs Annotatingfor annotators to do the actual labelingLabeling Jobs Reviewingfor reviewers to validate and correct annotations.
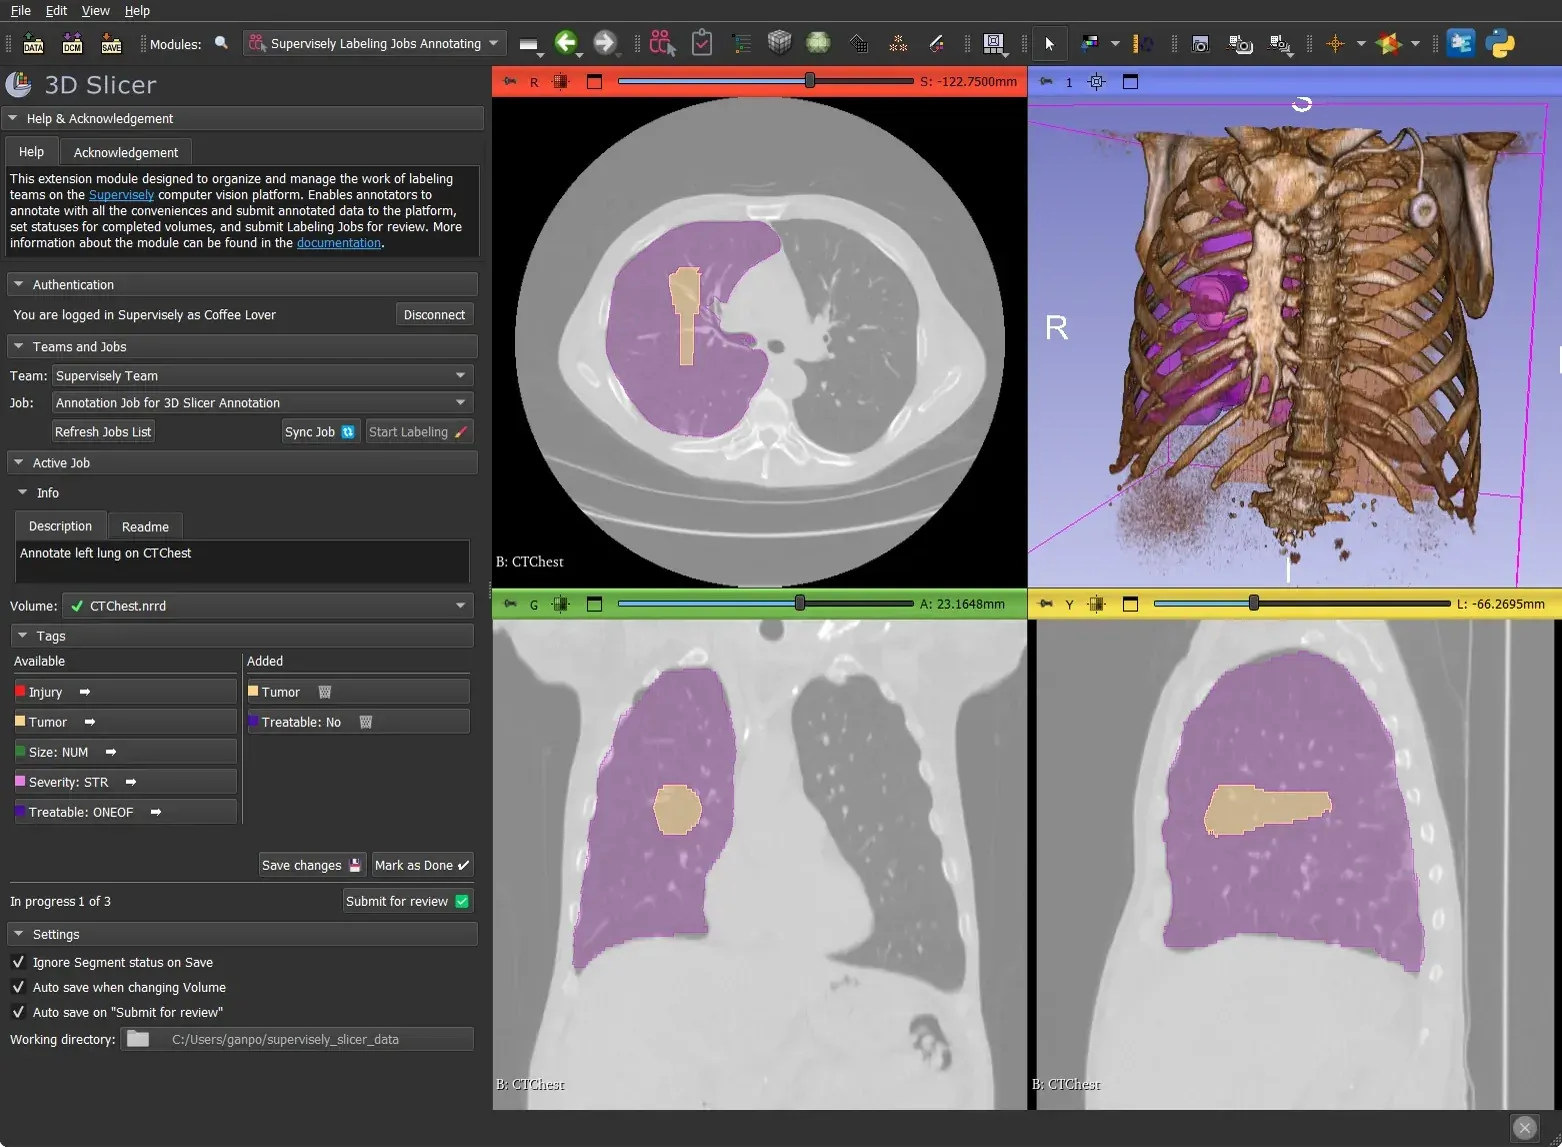 Labeling Jobs Annotating
In terms of user interface, these modules look the same with little difference in functionality.
Step 1: How to import data and prepare the workspace?
For more on the platform, see the video course.
You need an account. For the free version, sign up for the Community Edition. Enterprise Edition users have their own platform address.
After you log in, you become a member of an automatically created team, likely named Team of <your login>, with the default First Workspace selected.
- Within a Team, users share resources such as projects and models. Projects can only be created within a team, and you can switch teams or create new ones from the left menu.
- A Workspace is a separate "room" in a team where users organize projects and datasets. Each team has at least one.
You land on the Projects page.
- A Project is a combination of datasets and meta information (like classes and tags). It is the main building block of data organization in Supervisely.
- A Dataset is like a folder where your data is stored.
Click Import Data and follow the instructions. Then create the Classes and Tags you need for annotation.
Next, add annotators to your team. In the lower-left corner, click the name in the Current Team section and go to Manage Members. In Team Members, click INVITE, type the login and select a role, for example Annotator.
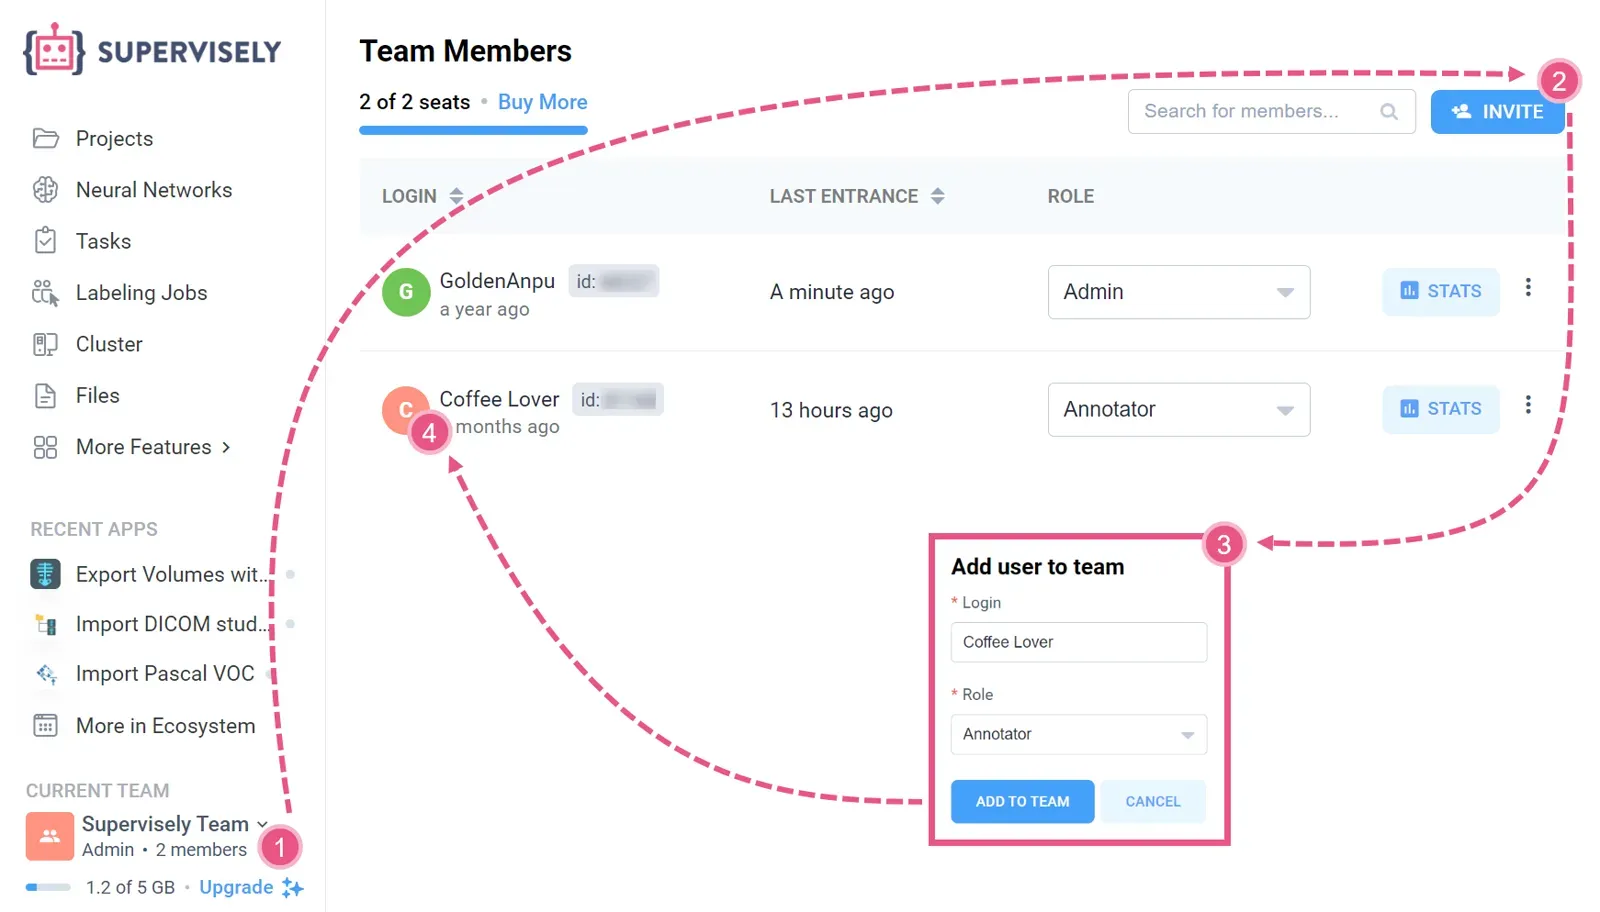 Inviting a team member in Supervisely
Step 2: How to create a Labeling Job?
The extension is based on Labeling Jobs, so you need one before you start.
Labeling Job in a Nutshell
Labeling Jobs organize and distribute annotation tasks within a team. Annotators work on well-defined portions of the dataset and follow consistent guidelines, which keeps data quality high.
Read more in "Mastering Labeling Jobs: Your Ultimate Guide".
Go to Labeling Jobs in the left sidebar and click + NEW in the upper right corner.
At minimum, describe the task and select the annotator, a reviewer, the project, and the classes and tags available for annotation.
Step 3: How to install the 3D Slicer extension?
The extension works on Linux, macOS and Windows. We recommend installing it from inside 3D Slicer. There are two ways:
- From the Extension Catalog
- From a local archive file, downloaded from the extensions catalog or from the GitHub releases
Install from the Extension Catalog in the application
→ Open Extension Manager Wizard
→ Go to the Install Extensions tab
→ Type Supervisely in the search field
→ Click the Install button under the extensions description
☝️ If you get an error when you click on the "Install" button,
sometimes updating the catalog using the "Check for updates" button helps.
Install from the downloaded archive file
Files for each OS are on the extension catalog website and in the GitHub releases. Select your operating system in the top right corner of the catalog page.
- In the
Extension Manager Wizardof 3D Slicer, selectInstall from file. - Select the downloaded file and click
Open. After installing, you are prompted to reboot the application. - After rebooting, the first time you open a module, an information window shows the installation of the Supervisely Python SDK, which the extension needs.
Waituntil it finishes. - 3D Slicer then reboots automatically, and you can start working.
☝️Each release is marked with the 3D Slicer version it is built for. Installing on a different version may fail. In that case, use the Extension Catalog option.
Step 4: How to open the extension and log in?
After the install and restart, open a module by selecting the Supervisely tab in the list of modules.
Pro Tip
To get quick access to the modules:
→ Open the Edit menu on the top bar
→ Go to the Application Settings
→ Choose the Modules section
→ Find in the Modules unit Supervisely's modules
→ Drag and drop them to the Favorite Modules unit and save with the OK button
Authentication Tab
Log in to the Supervisely server where your data is located.
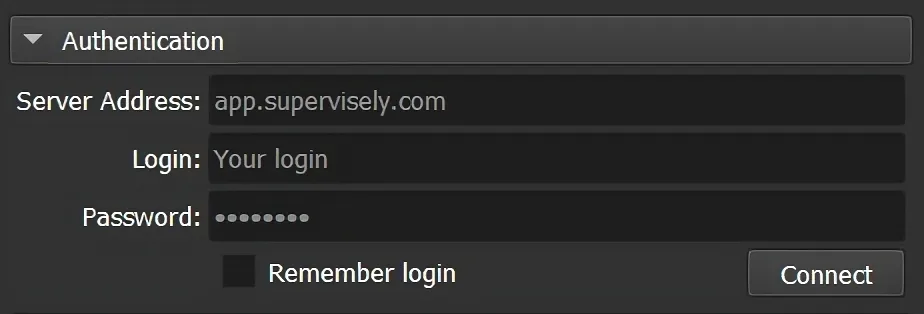 Enter credentials here
With the Remember login setting, the extension does not store what you typed. Later logins use the received API token, which is stored in a separate .env file in the current user directory of the operating system.
 You will be automatically logged in
Teams and Jobs Tab
After login you see the Labeling Jobs available to you in your teams.
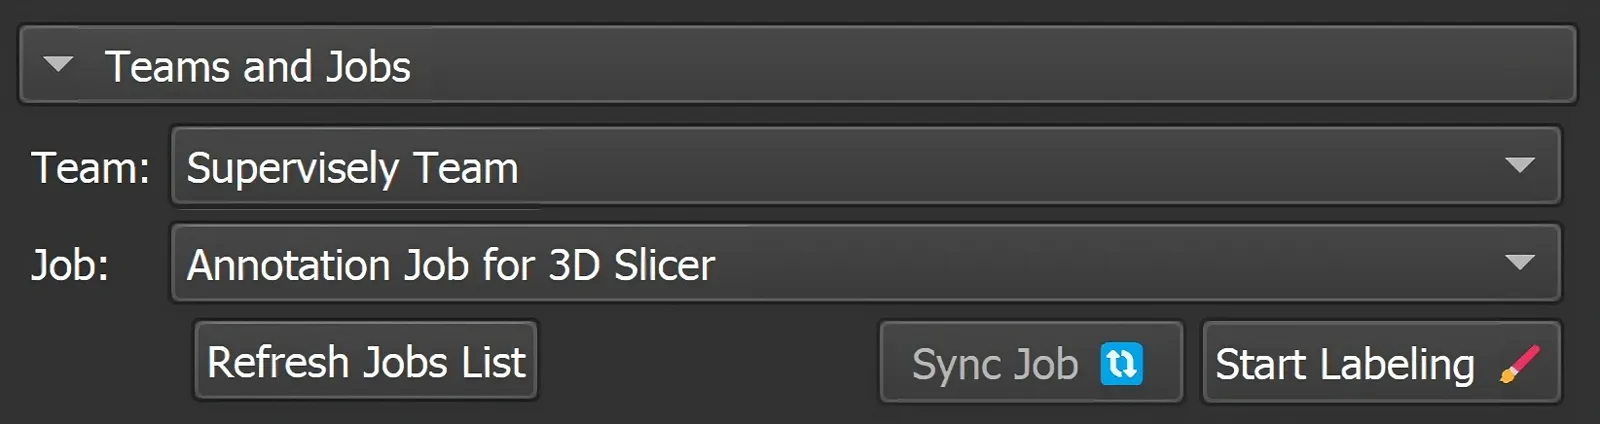 Team and Jobs
The list shows only Jobs with status Pending or In progress where you are the annotator. Click Refresh Jobs List at any time to update it. This does not reset your current workflow.
Active Job Tab
In the Labeling Jobs Annotating module, the Info tab shows the Job description and the list of Volumes to annotate. You can edit Tags, set statuses for Volumes, see how many Volumes are annotated, and send the Labeling Job for review when the work is done.
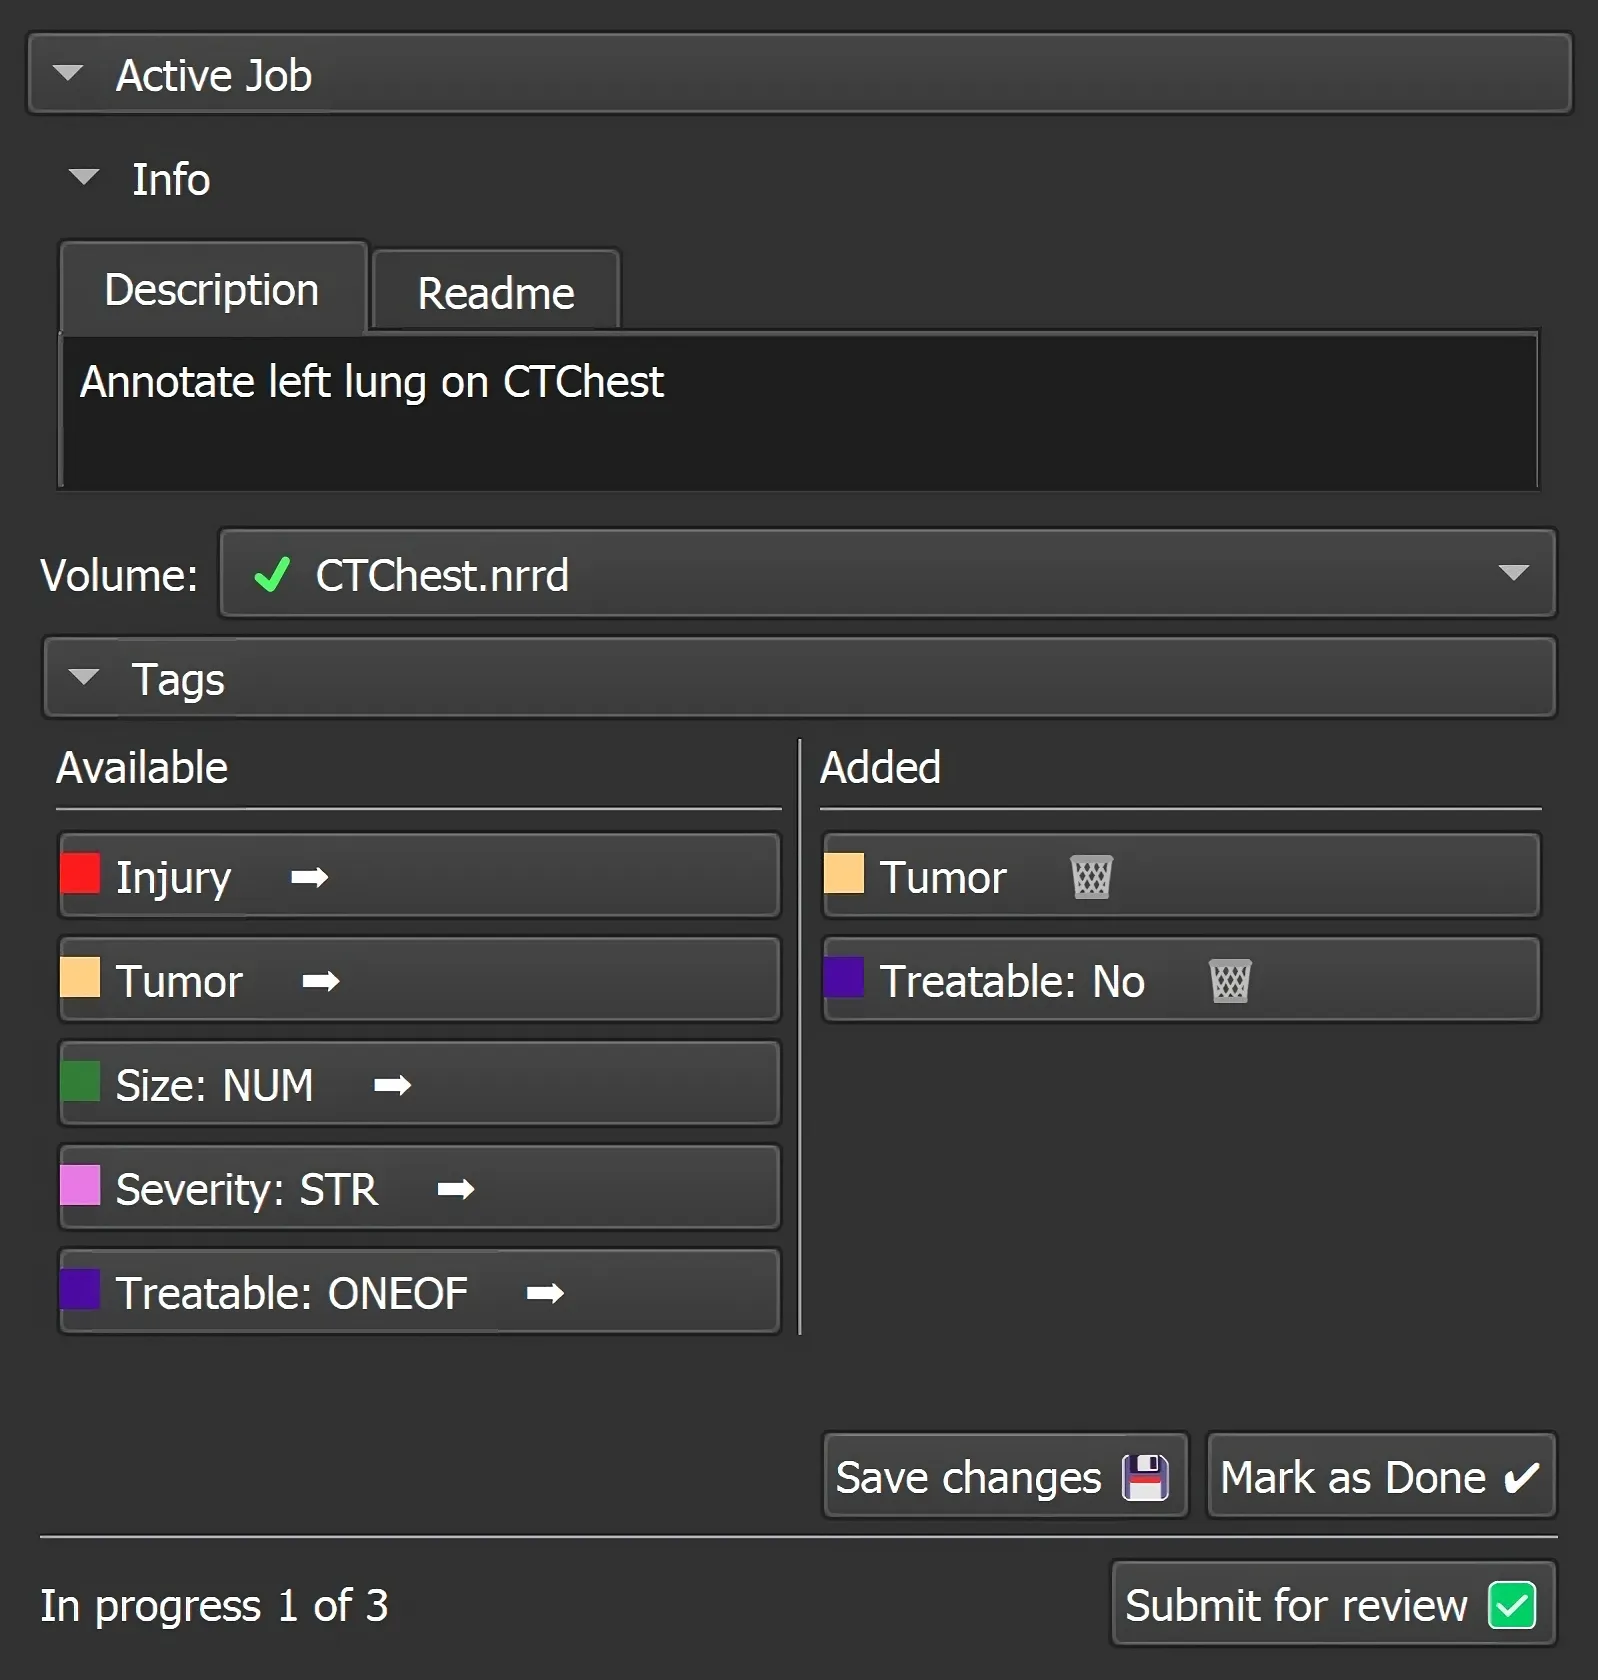 Labeling Jobs Annotating: Active Job
In the Labeling Jobs Reviewing module, the tab is almost the same. It lists the objects to check with their annotations. You set statuses for Volumes, then restart the Job or finish it with the result.
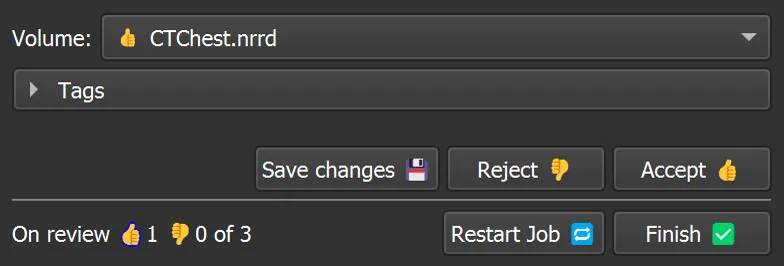 Labeling Jobs Reviewing: Active Job
☝️ In both modules you create and edit annotations with the built-in 3D Slicer tools: Segment Editor, Segmentations and others.
Settings Tab
This tab configures automatic triggers and other data-saving options. New options will appear here.
Step 5: How to annotate volumes in 3D Slicer?
In Labeling Jobs Annotating, select the Team and Job. Click Start Labeling to download the data from the server.
💡 Speed up your workflow by starting in the Supervisely Labeling Tool and then switching to 3D Slicer. For example, to mark a human lung quickly, use the Smart Tool:
Learn how it works in "How To Use Model Assisted Labeling To Boost Annotation Performance With Supervisely".
If you used the Smart Tool, click Sync Job to get the latest changes from the project.
When the data is downloaded to the Working directory (adjustable in Settings), the Active Job tab unlocks. Selecting a Volume loads its data automatically.
In the module, you get:
- A list of available and attached
Tagsfor the Volume
On the scene, the extension creates:
Segmentations, which are the Classes available in the projectSegments, which are objects of these Classes
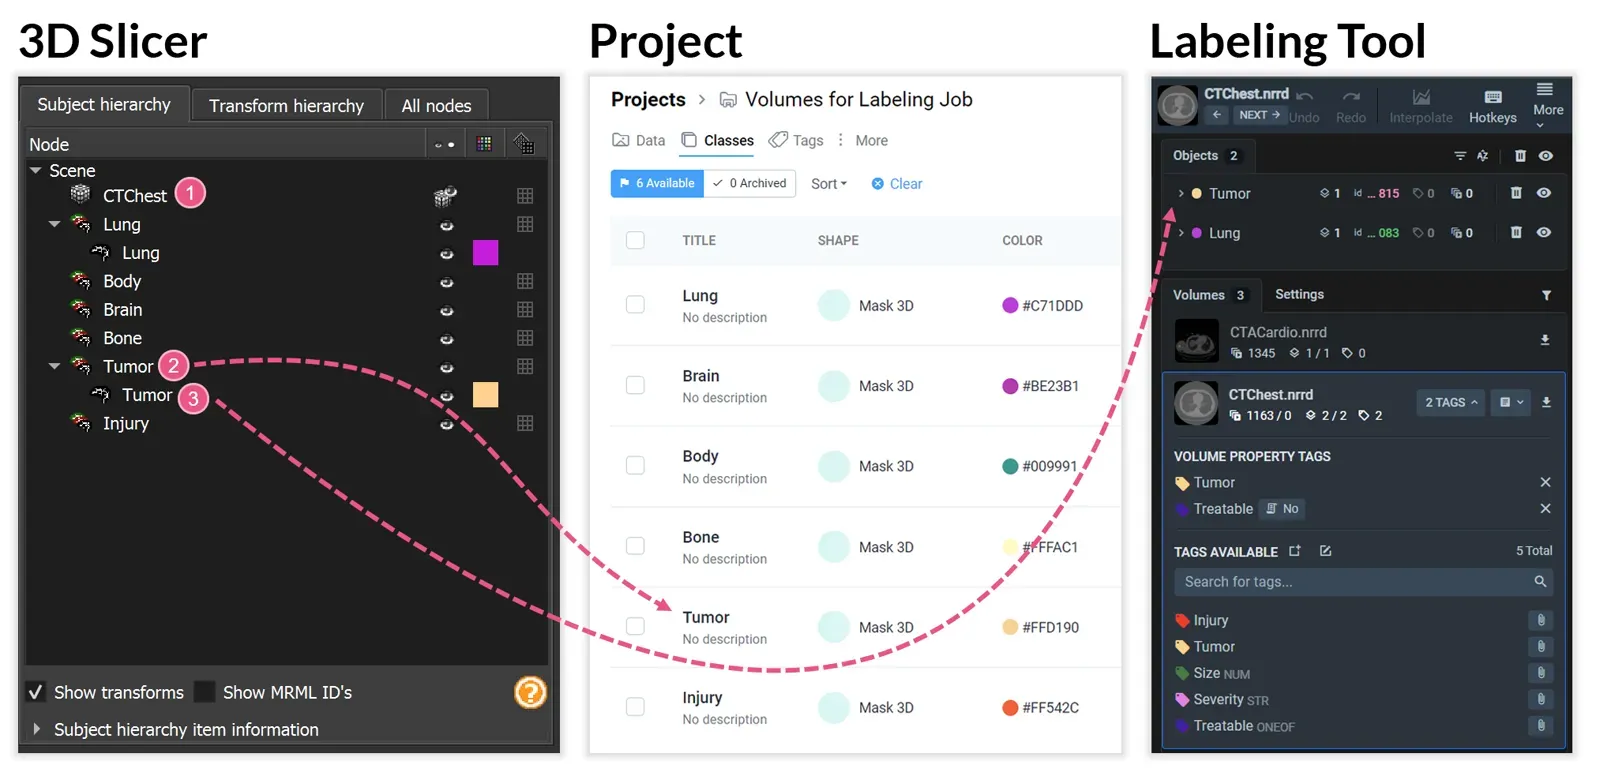 Segmentations and segments of a volume in 3D Slicer
1Volume: CTChest.nrrd2Supervisely Class: Tumor → Slicer Segmentation: Tumor3Supervisely Annotation Object: Tumor → Slicer Segment: Tumor
🤓 object name is always the same as the class name
Annotating
To edit, create or delete an annotation object, use any other 3D Slicer module that works with objects on the scene, such as Segment Editor or Segmentations.
To create a new object, select a Segmentation and add a new Segment. You do not need to name it or change its color, because it is converted to the class name and color on upload. You can still rename or recolor it for convenience.
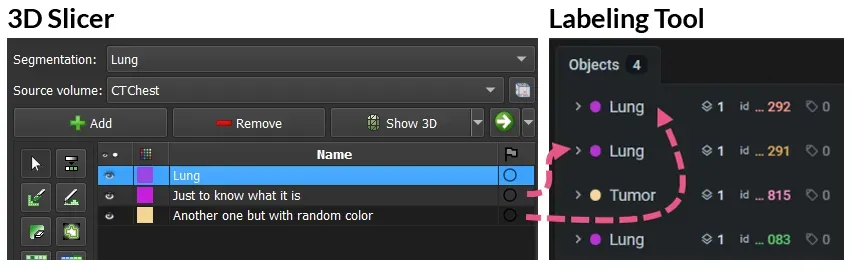 Creating a new segment in 3D Slicer
In Segment Editor you can use the Ignore Segment status on Save setting to control saving more flexibly.
Tagging
- The
Tagstab is not active if there are no tags. - Tag availability depends on the Labeling Job settings.
- Tags can be added ➕ and removed ➖.
Click a tag in the list of available tags to attach it to the Volume. Click an attached tag to detach it.
Status changing
After you create the annotations and save, set the "Done" status for the current Volume. You can still make changes afterward.
When all tasks in the Labeling Job are complete, click Submit for review. The Job status changes, it disappears from the list, and the scene and local Job data are cleared.
Step 6: How to review annotations in 3D Slicer?
Review works like annotation, with extra statuses, the ability to Restart or Finish the Labeling Job, and its own module settings.
The reviewer usually:
- Reads the technical description and opens the
Labeling Jobs Reviewingmodule. - Optionally corrects the labeler's annotations.
- Accepts 👍 or Rejects 👎 each Volume.
- Finalizes the Labeling Job once all data in the dataset is reviewed.
💡Extension settings explanation
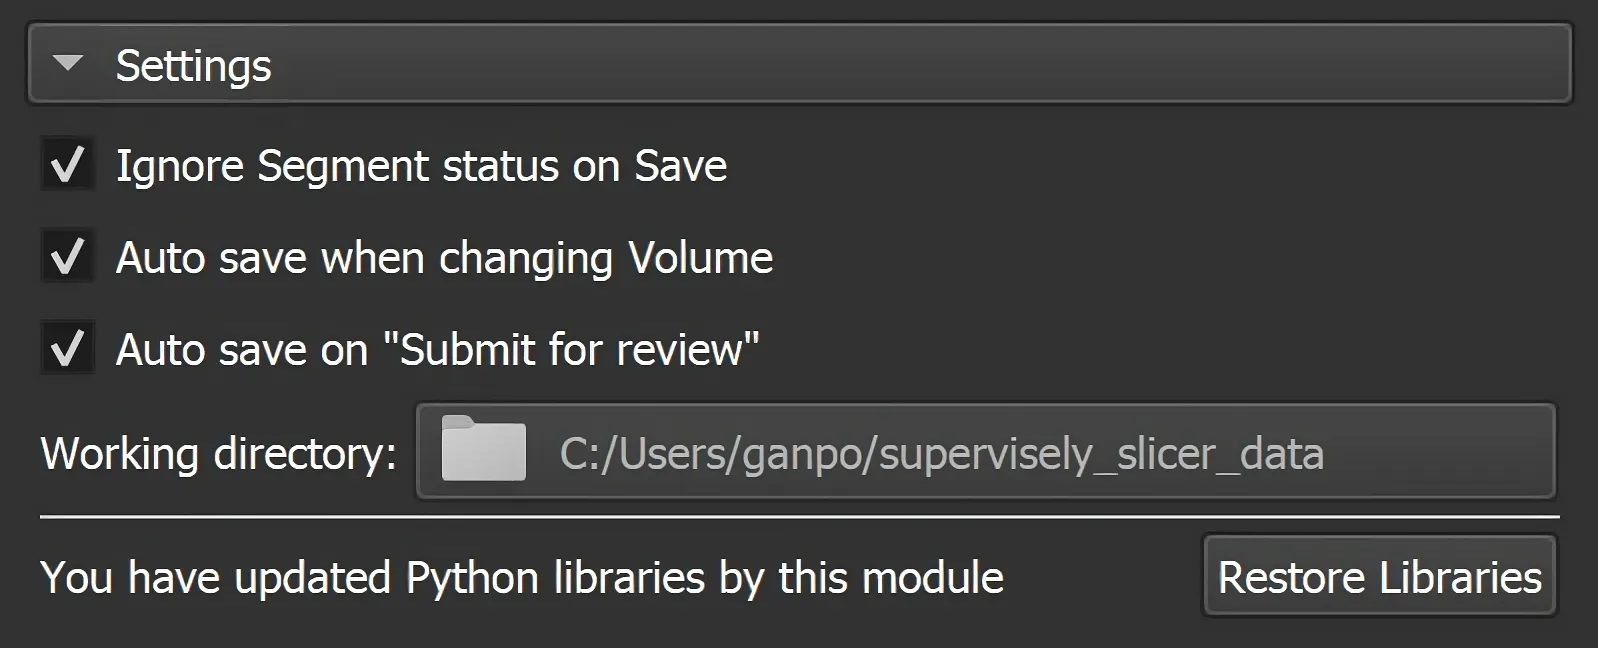 Example: Annotating Module Settings
Remember login
The server address and the account token from the first login are saved to a .env file for simpler connection later.
Ignore Segment status on Save
When checked (default), all segments are saved regardless of status.
Otherwise, segments with status Completed are saved, and segments with status In progress initiate a save request.
Segments with other statuses are not saved, but their state in the current scene does not change. To reset it, use Sync Job.
⚠️ Deleted segments are deleted on Save regardless of settings and statuses.
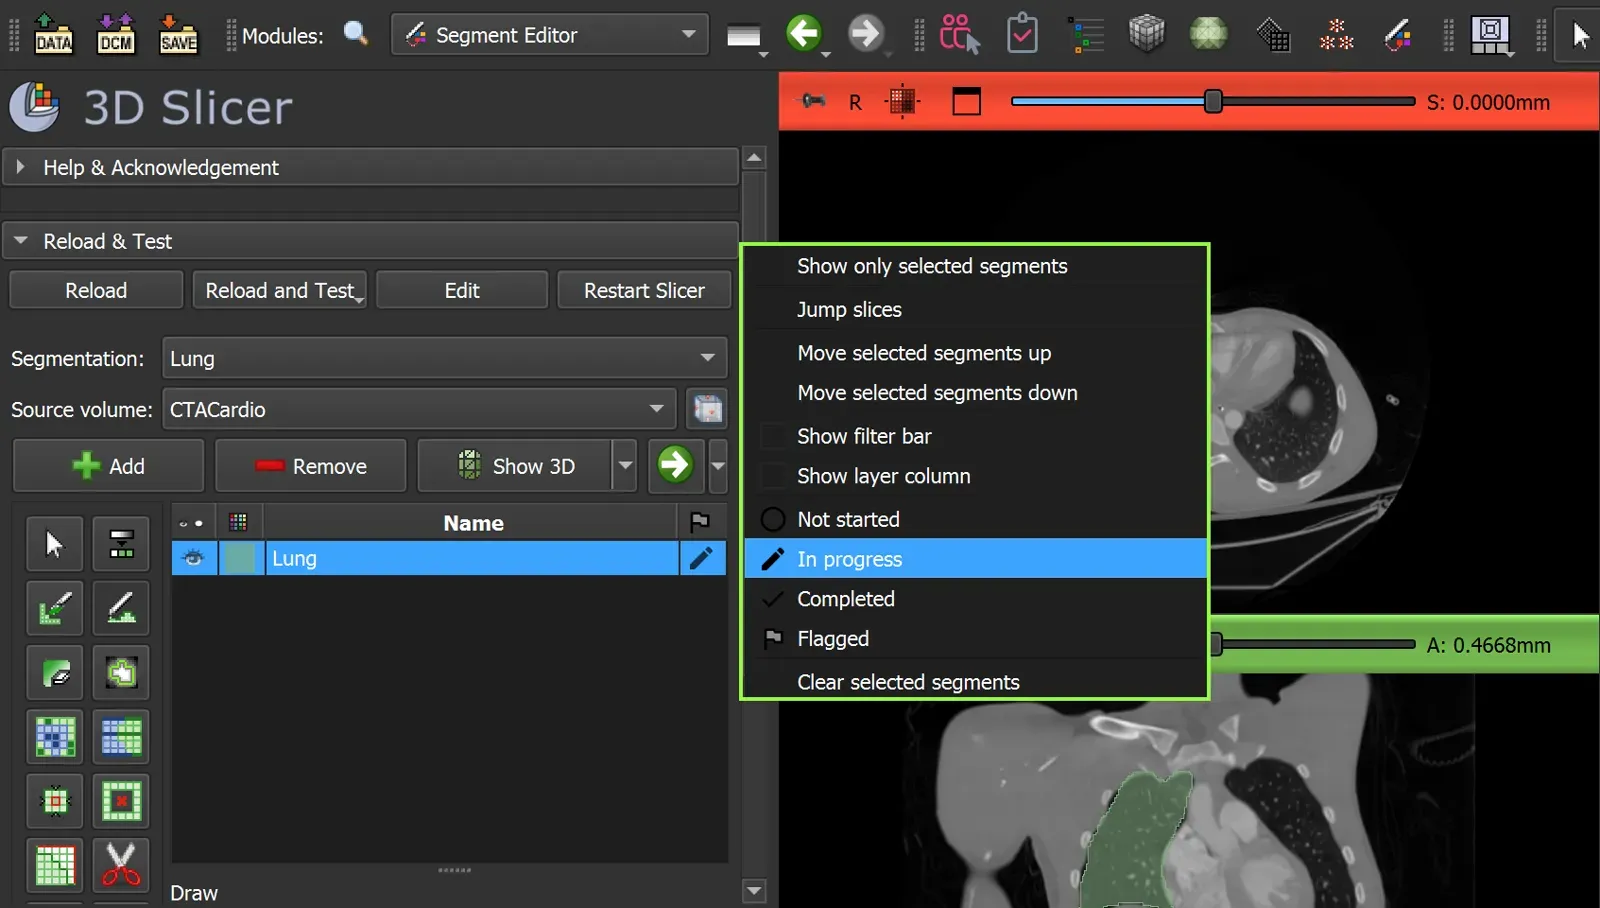 Segment statuses
Auto save when changing Volume
Saves your changes when you switch between Volumes without saving manually.
Auto save on "Submit for review" Annotating module only
Saves automatically when you submit the Labeling Job after the last Volume. To submit without your latest changes, uncheck it first.
Restart Job with only rejected volumes Reviewing module only
Two options for restarting the Job:
- By default, it restarts the Job only with Volumes marked
Rejected. - When off, it marks all unmarked Volumes (neither
AcceptednorRejected) asRejectedand restarts the job like the first option.
Working directory
The local folder where Labeling Job data is stored.
Restore Libraries
If Python library versions conflict during the Supervisely package installation and you still want to proceed, you can restore the libraries to their original versions.
Summary
The ConnectToSupervisely extension lets you work with platform data from 3D Slicer as easily as from the web interface, and still use the extensions in the 3D Slicer catalog. It is open source, so you can also extend it.
Frequently asked questions
How do I connect 3D Slicer to Supervisely?
Install the ConnectToSupervisely extension from the 3D Slicer Extension Catalog, restart Slicer, open the Supervisely module and log in. Then pick a team and a labeling job and click Start Labeling to download the data.
Which 3D Slicer modules does the extension add?
Two modules. Labeling Jobs Annotating is for annotators who do the labeling, and Labeling Jobs Reviewing is for reviewers who validate and correct annotations. They look almost the same, with small differences in functionality.
Which operating systems does the extension support?
Linux, macOS and Windows. Each release is built for a specific 3D Slicer version, and installing on a different version may fail, so installing from the Extension Catalog inside 3D Slicer is recommended.
Can I start labeling in the browser and finish in 3D Slicer?
Yes. For example, you can mark a lung quickly with the Smart Tool in the Supervisely labeling tool, then switch to 3D Slicer for 3D editing and return to the web interface to complete the job.
Why use 3D Slicer with Supervisely instead of 3D Slicer alone?
Supervisely adds browser access, user permissions, SSO, labeling and review jobs, activity tracking, consensus labeling and model tools. 3D Slicer adds its own niche annotation and visualization tools. The extension lets one team use both.
What data formats can I use?
Supervisely supports DICOM and other popular formats for medical volumes, and the annotations are 3D mask volumes, so 3D Slicer can work with this data directly.