Lessons Learned From Training a Segmentation Model On Synthetic Data

We are pleased to share our experience gained from training dozens of models using synthetic data. In this blog post we will provide insights into the training process and present methods to enhance the quality of synthetic data.
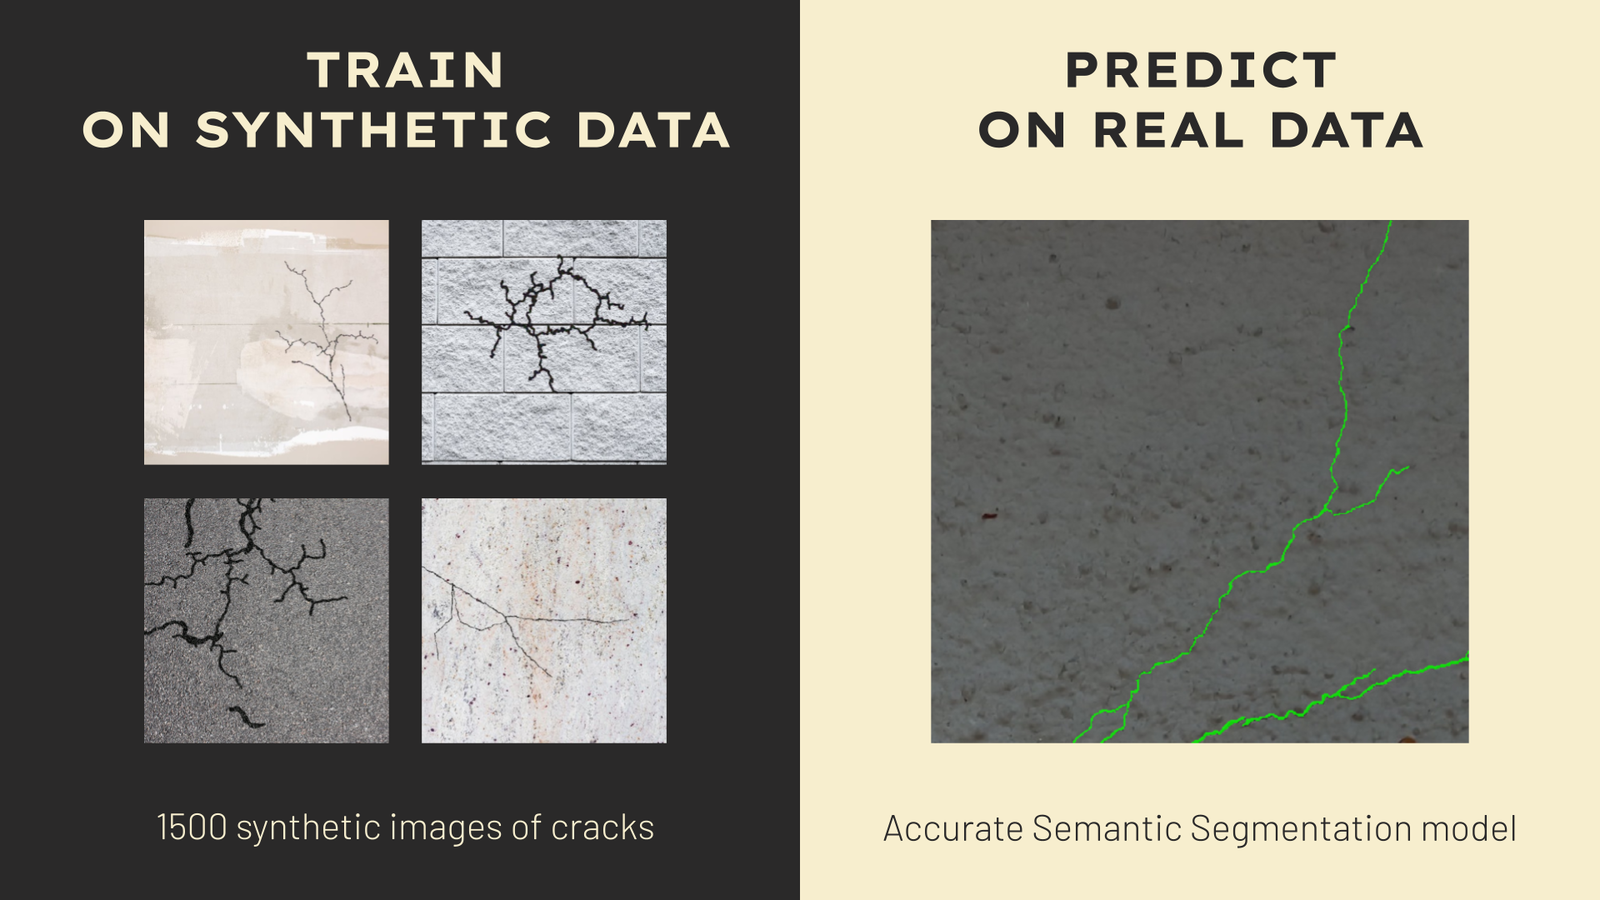
Table of Contents
Recently we have presented our Synthetic Crack Segmentation Dataset. We have an overview of how we created it from scratch here: Introducing Supervisely Synthetic Crack Segmentation Dataset.
In this article and video tutorial we're diving deep into the improvements and heuristics we've applied to our synthetic data generation process. After reading this post you'll see how we've managed to create a dataset that allows to train a model almost as efficiently as if we were using real data.
This blog post is the Part 3 in the series of posts where we share results of our experiments on leveraging synthetic training data to get the accurate and robust semantic segmentation model on very challenging tasks - cracks segmentation:
- Part 1. How to Train Interactive Smart Tool for Precise Cracks Segmentation in Industrial Inspection
- Part 2. Introducing Supervisely Synthetic Crack Segmentation Dataset
- Part 3. 👉 Lessons Learned From Training a Segmentation Model On Synthetic Data
- Part 4. Unleash The Power of Domain Adaptation - How to Train Perfect Segmentation Model on Synthetic Data with HRDA
A Quick Recap of the Dataset Creation Process
Let's recall the general idea of the synthetic dataset creation process, which we’ve discussed in detail in the this post.


Supervisely Synthetic Crack Segmentation
Supervisely Synthetic Crack Segmentation is a dataset for a semantic segmentation of cracks in industrial inspection. Obtaining real-world annotated data for crack segmentation can be challenging. The detailed, pixel-perfect nature of segmentation requires extensive labor and often expert knowledge, making the process time-consuming and costly. Synthetic data offers a promising solution to these challenges. It provides a controlled, cost-effective, and automated alternative to real-world data collection and manual annotation..
Get in Dataset Ninja
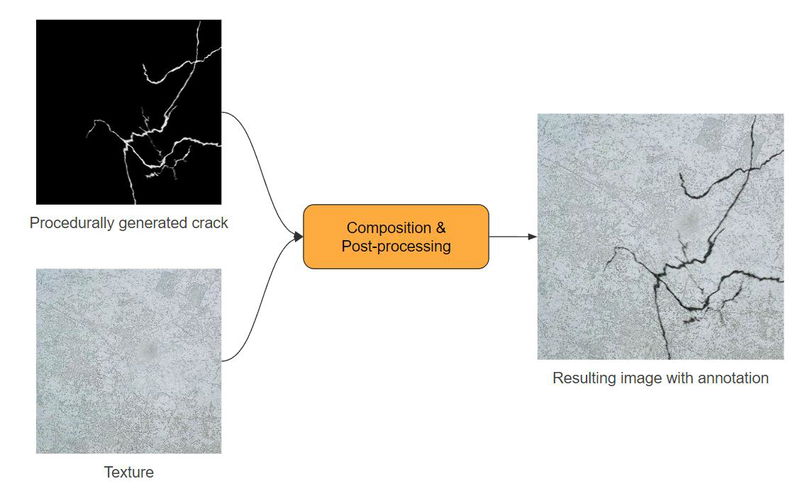
We began by collecting real-world textures such as asphalt, walls, and concrete. Think of it as if you were drawing cracks on these textures, much like using a brush in a paint program. However, that's just the beginning. We'll take it a step further with some Composition & Post-processing techniques to transform these drawn cracks into realistic ones. In the following sections, we'll dive deeper into the world of Composition & Post-processing.
 The main concept of the Data Synthesis
Data-centric vs Model-centric Approaches
In the world of machine learning and AI, there are primarily two philosophies for enhancing models performance: Data-centric and Model-centric approaches. Model-centric methods primarily concentrate on refining the model's architecture, size, and training techniques. Conversely, the Data-centric philosophy places its emphasis on enhancing the quality, diversity, and relevance of the training data. The fundamental belief is that superior data leads to superior models, even if the model's architecture remains unchanged. In this context, we adhere to the Data-centric approach. Throughout our experiments, we maintain the same model architecture, model size, and hyperparameters. You can find detailed information about the architecture and training in the article's concluding sections.
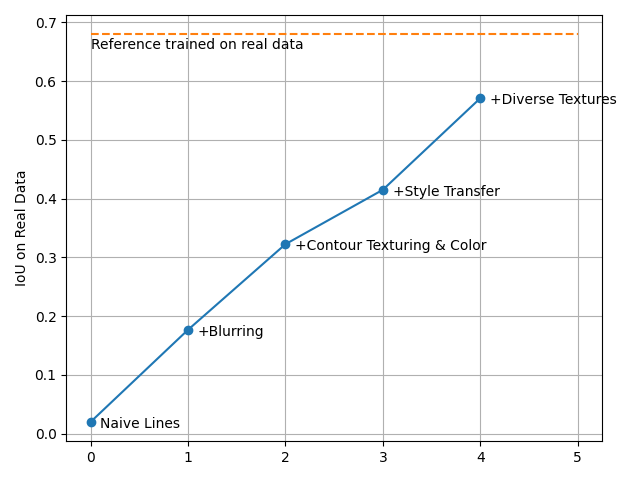
Let's explore all the step-by-step enhancements and heuristics that have been employed to create synthetic data capable of training a model that is on par with one trained on real data.
Step 1. Generator
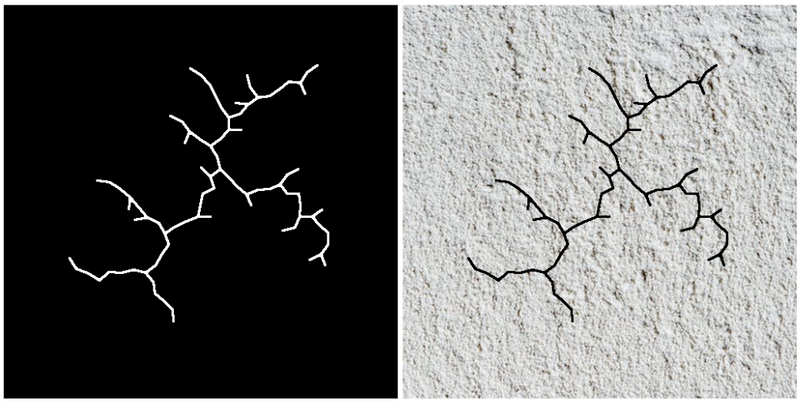
The Generator is at the core of our synthetic data creation process. The Generator should be designed to mimic the intricate and varied structures of actual cracks. This preliminary representation serves as the bedrock upon which further processing and refinements will be made, pushing the synthesized images closer to reality.
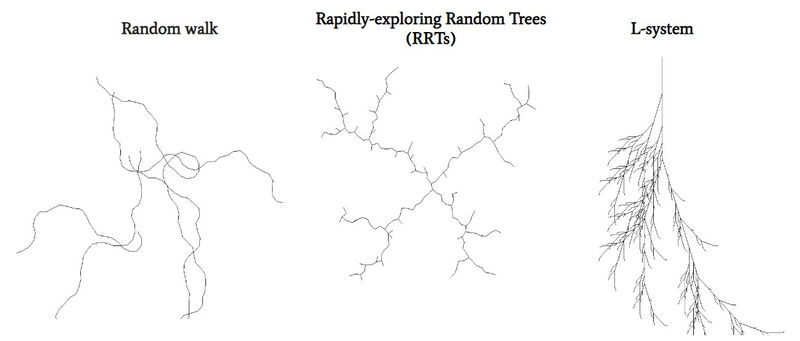
We found that the composition of 3 various types of algorithms can serve well as the Generator:
 The Generators
By merging these patterns and layering them sequentially, we can generate intricate and varied structures for the prospective cracks. The output of the Generator consists of a 1-pixel contour atop a white background, serving as a blueprint for subsequent processing. For the Random Walk, we incorporated a progressively altering thickness to enhance the diversity of the data.
You can read more about each type of the algorithm: Random walk (implementation in Python), Rapidly-exploring Random Tree, L-system.
Step 2. Dilate & Corrupt
First, we need to add thickness to our lines. In python we use cv2.dilate for this. There is a need to tweak some parameters like number of iterations, kernel and kernel_size. We keep them in some random range to increase the variety. The kernel might be randomized too.
 Dilate
Then we want to somehow corrupt the lines. We use iaa.ElasticTransformation from the ImgAug package:
 ElasticTransformation
We also apply iaa.PiecewiseAffine to further distort the image:
 PiecewiseAffine
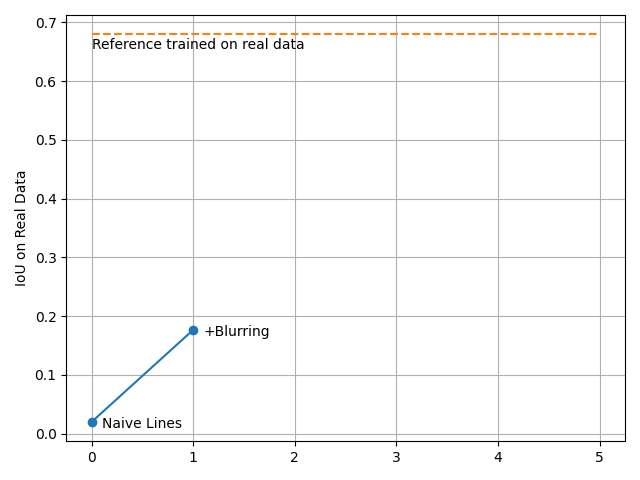
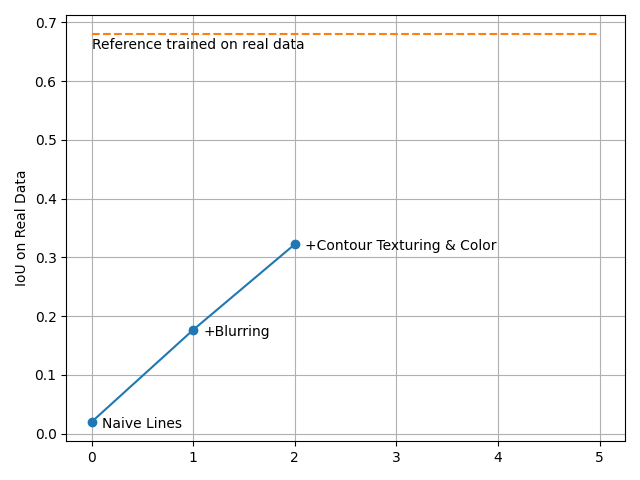
First Training: At this point, the resulting generated images might look pretty convincing, but when it comes to training a good model, we often need a higher level of realism, especially in details. We have tried training a model on such images, and it immediately overfitted resulting in terrible performance on real images.
Step 3. Edge Smoothing
Upon closer examination, it became evident that our cracks exhibited sharp-edged lines cutting into the background. This level of detail might appear artificial to the trained model, potentially leading to overfitting, where the model performs perfectly on synthetic data but fails on real data. Notably, this level of detail, while not obvious to the human eye, could pose challenges for the model's generalization. To mitigate this issue, we introduce a blurring effect to the cracks by applying a combination of iaa.GaussianBlur and iaa.MotionBlur with a certain probability:
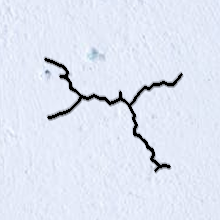
With this little trick, we managed to train a model that did not overfitted, but the IoU on the real images is still far from a satisfactory value:
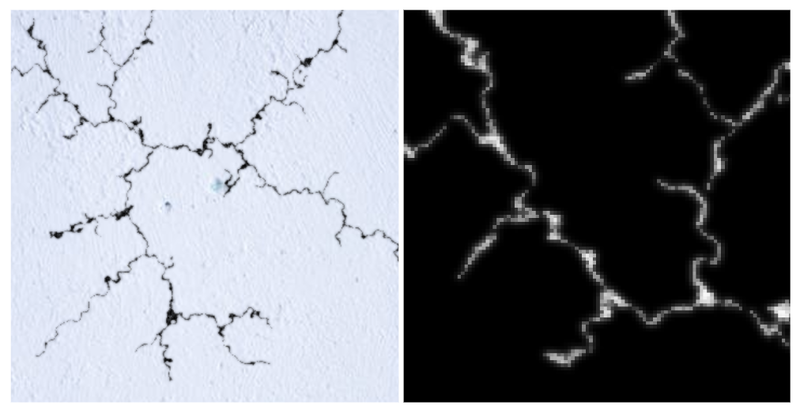
 Validation on real data
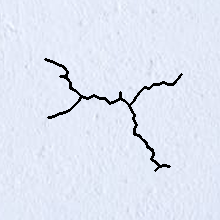
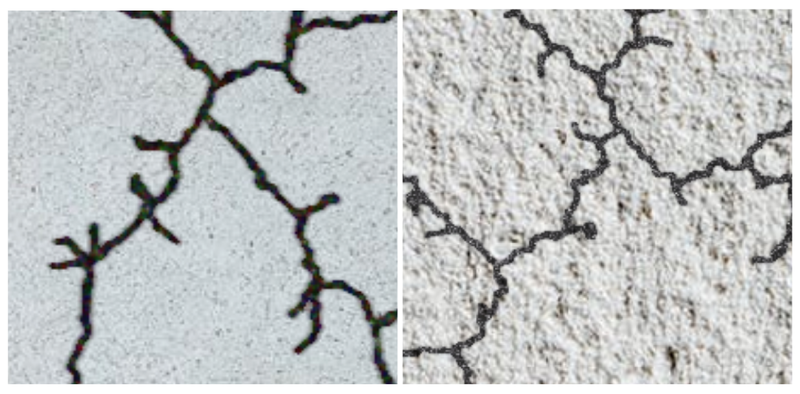
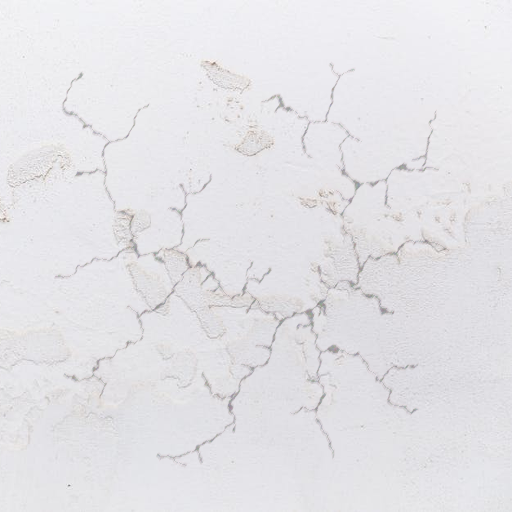
Step 4. Contour Texturing
Currently, our lines are created with a stark, unblemished black color – a far cry from the way they appear in reality. Our goal is to infuse these lines with a richer, more unpredictable texture. Here's a neat trick we discovered: instead of dilating the lines, we occasionally add a bit of blurred noise right over the crack from the Generator (i.e. the 1-pixel lines). This noise with a combination of iaa.ElasticTransformation dissolves the pixels of a crack, spreading them out, and the crack becomes thicker without use of dilating.
 Contour Texturing
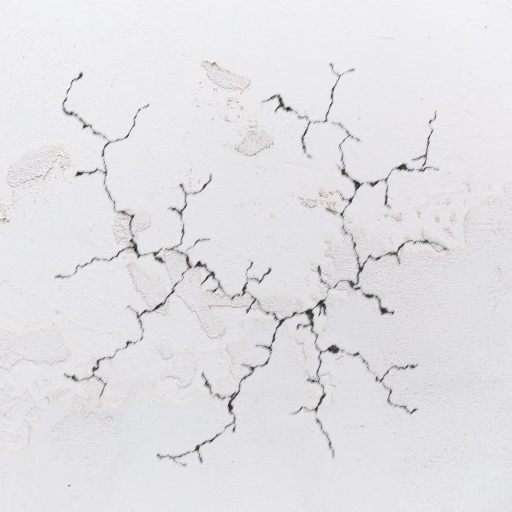
Step 5. Coloring
Moving forward with enhancing the line texture, we'll infuse them with a random shade of dark, sprinkled with a touch of noise. This tweak ensures our cracks aren't just plain and flat. This change is almost imperceptible to the eye, but it may be significant for the model. Here are some notable examples:
 Coloring
Training the model at this step has pushed the performance even further:
 Validation on real data
Tuning Parameter Randomization
In our experiments, one question consistently arises: How can we determine the optimal values for parameters such as noise level, line thickness, or blur intensity? We thoroughly examine the images generated at both the highest and lowest extremes of our selected range for each parameter. While reviewing these edge cases, we occasionally allow the results to appear somewhat unrealistic, surpassing the bounds of reality. This approach can contribute to the development of a more resilient and effective model.
Why can unreal images be useful?
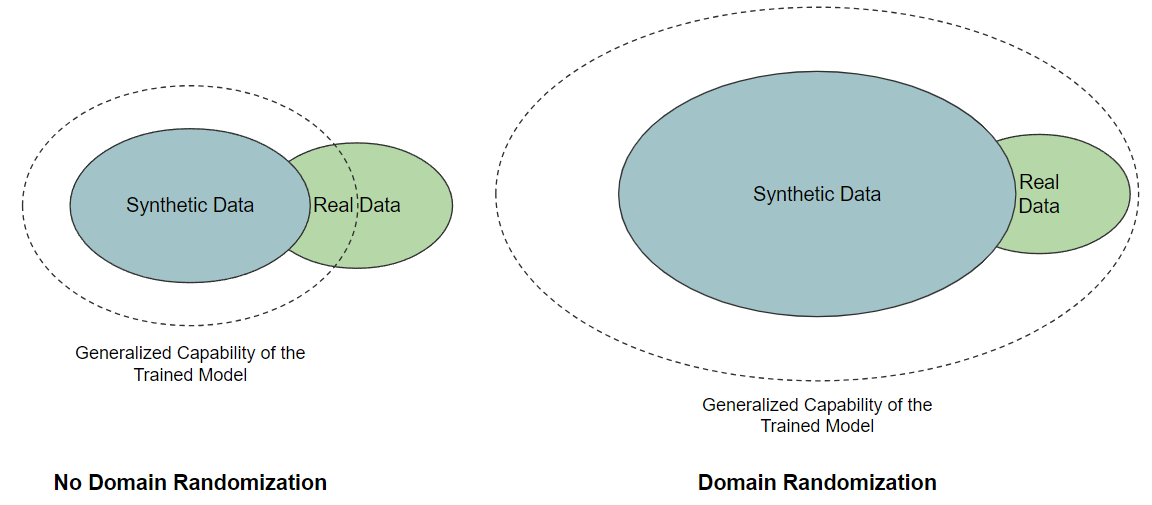
In research, especially robotics, this technique is called Domain Randomization. In essence, Domain Randomization is about making your model adaptable by diversifying its training environment, rather than perfecting the realism of that environment. Instead of trying to make the synthetic data perfectly realistic (which is very challenging), the idea is to randomize various aspects of the synthetic data, especially ones that are really hard to make natural. By exposing the model to a vast array of different scenarios, even if individually they aren't always "realistic," the model learns to generalize better.
Why it works?
Let’s face it, our synthetic data doesn't quite nail the realism we're aiming for. However, by injecting more variety into our synthetic dataset, we can train a model that is good at handling many different situations. After being trained across a myriad of randomized domains, the real world becomes just another variation to the model. Essentially, it's about training the model to expect the unexpected!
Step 6. Boosting Data Diversity with Style Transfer
Understanding the pivotal role diversity plays in our dataset, we are now exploring an exciting method: Style Transfer. Style Transfer is a technique in which the style of one image, known as the "style image", is transferred to another image called the "content image". The goal is to produce a new image that retains the content of the original image but has the artistic style of the style image. Now, if we take one of our generated crack images and use a background picture as the "style image", the result of Style Transfer will look like this:
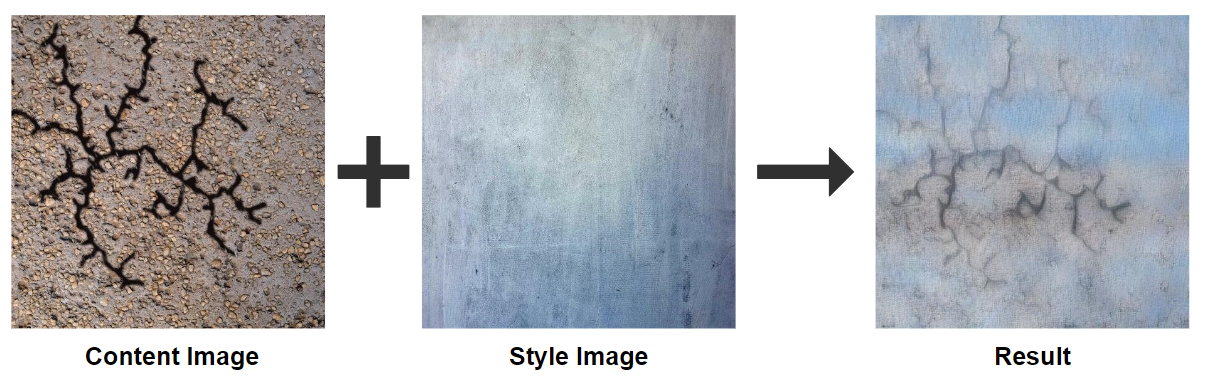
Choosing a specific model for style transfer isn't our main concern since we're not aiming for realism. Our goal is just to visually alter the crack image while maintaining the same segmentation mask (or ground truth). For our tests, we utilized the Arbitrary Style Transfer model from PaddlePaddle (paper, github)
We trained the model again and found that Style Transfer significantly improves performance.
 Validation on real data
Step 7. Enhancing Diversity of Textures
At the start of this research, our primary goal was the segmentation of cracks on roads. This meant that our foundational background textures primarily consisted of the dark shades of asphalt. To enhance the versatility of our model, we then introduced a range of new backgrounds. These spanned a variety of materials, including concrete, walls, tiles, bricks, marble, and more.
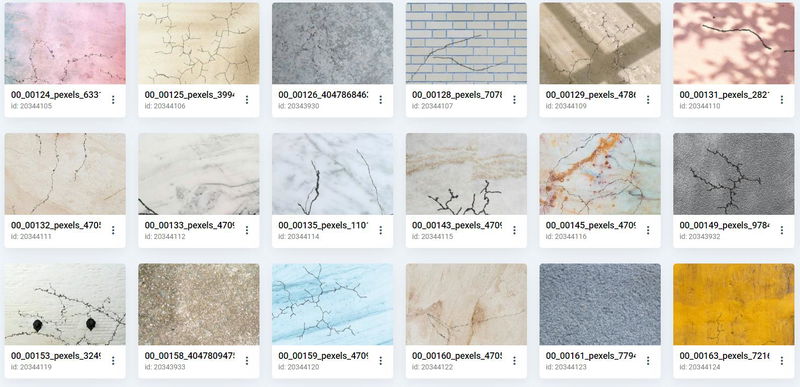 A set of new backgrounds
This expansion presented a new challenge. As lighter backgrounds were introduced, it became apparent that the dark, well-defined cracks we had originally designed stood out too starkly against them. Cracks on a white or bright surface, for instance, shouldn't pop out as deep black lines – they need to blend more seamlessly. This prompted us to refine our approach by adjusting the adaptive brightness of our cracks, ensuring they appeared natural against every background.
With these modifications, we re-trained our model and further improved performance.
 Validation on real data
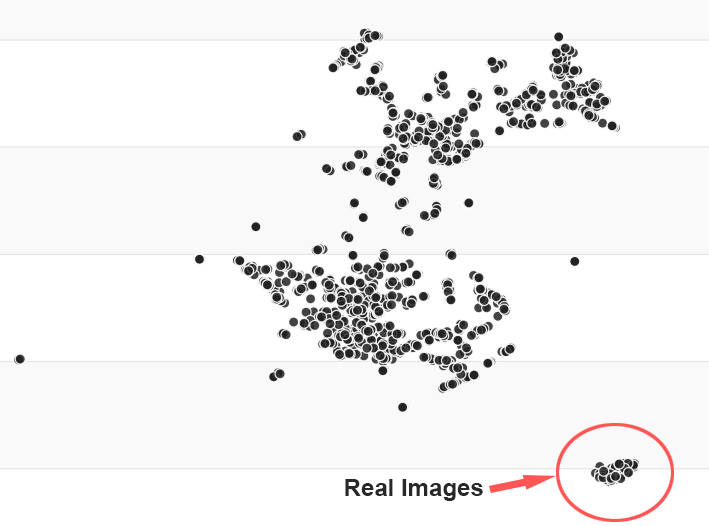
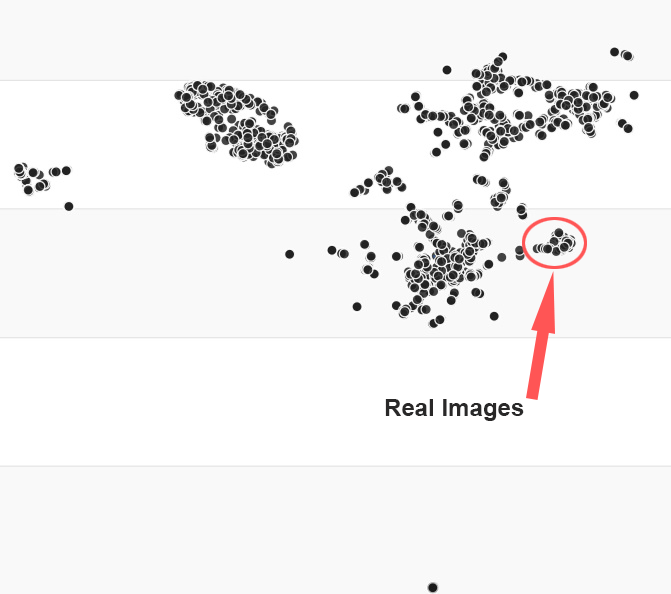
Visualize and Explore your Synthetic Data
In Supervisely Ecosystem we offer Explore Data with Embeddings App designed for visualization and data quality assessment. This App offers a visual representation of the intricate relationships within your high-dimensional dataset. This visualization aids in swiftly comprehending the quality, diversity, and potential issues present in your synthetic data, empowering you to make more informed refinements and adjustments.

Explore data with embeddings
Calculate and visualize embeddings
How it works: Under the hood, the App processes your dataset using a pre-trained visual model like CLIP, obtaining embeddings (representations) for each image. It then employs UMAP to create visualizations based on these embeddings. You can easily explore the connections between images by clicking on them within the app.
Let's take a closer look at our synthetic dataset. We'll see how it transformed after we introduced Style Transfer and broadened our collection with the new textures.
As long as we used only asphalt and road background textures and didn’t introduce Style Transfer, we can see that the real images are clearly separated into a distinct cluster, and the generated images are distributed mostly in the two visible clusters.
After we added Style Transfer and enriched our collection with new textures, the real images are not so clearly distinguished from the data, and the data itself spreads wider, although they also have visible clusters, especially a large dense cloud of points on the left consisting of images processed by Style Transfer model:
Key Considerations for Effective Data Synthesizing
In summary, here is a list of the critical aspects of data synthesis that require your attention:
-
Realism, especially in details: Ensure that the synthetic data closely resembles real-world data in terms of patterns, variations, and intricacies. Synthetic algorithms can often be rough in creating details. This causes problems in the data that may not be obvious to the human eye, but be crucial to the model, which leads to overfitting and poor generalization.
-
Diversity & Variation: Ensure a wide range of scenarios, conditions, and variations are covered. Synthetic data should encompass as many potential real-world situations as possible to prevent overfitting and unstable performance on the real data.
-
Imperfection & Randomization: Intentionally introduce noise, anomalies, blurring and distortion that may even look a bit unrealistic in extreme cases. Synthetic algorithms cannot express all the complexity and authenticity of the real world, they only create simplified and idealistic versions of it. So inducing randomness and imperfection will help to train a robust model that can handle unexpected or outlier situations when deployed in real-world scenarios.
-
Continuous Validation: Regularly validate the synthetic data against real-world data. This helps reveal the problems in the data that can prevent the model from generalizing well.
Conclusion
After a series of experiments, we've come to a noteworthy result. Through a gradual refinement of our synthetic data generation techniques, we have effectively trained a model that demonstrates nearly comparable performance to its counterpart trained exclusively on real-world data. In the upcoming part of this blog series, we will introduce an additional approach for training using Synthetic Data – the one that outperforms our reference model. This part will delve into the technique called Domain Adaptation, providing further enrichment to our experiments.
Appendix: The Training Details
We trained SegFormer MiT-B3 pre-trained on ADE20K for 20-25 epochs in 512x512 resolution with batch size of 6, using Adam optimizer with Learning Rate 6e-5 and Weight Decay 1e-4. We use DiceLoss and Step LR Scheduler with one milestone at 17th or 20th epoch and a warmup during 1000 iterations. The amount of synthetic data was in the range of 1300-1700 images.

Train MMSegmentation
Dashboard to configure, start and monitor training
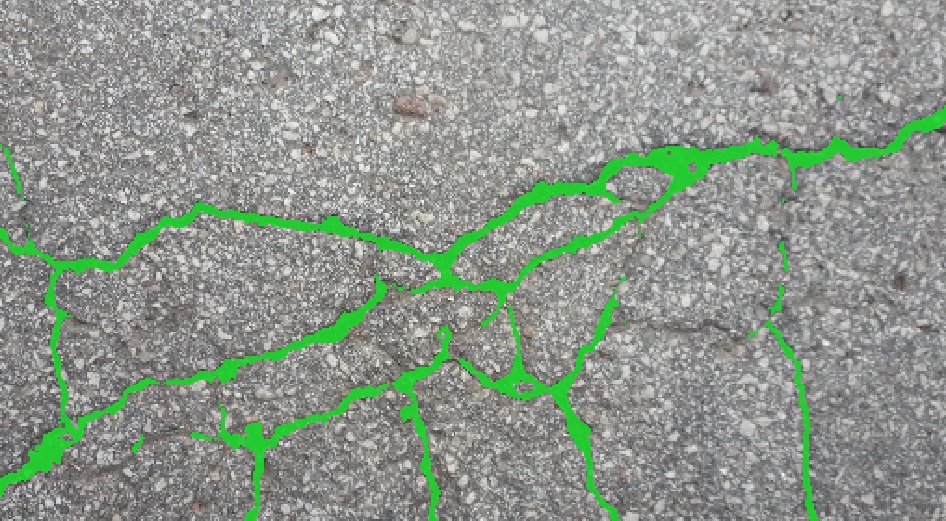
We've also trained a Reference model exclusively on real images for comparative purposes. This model was trained using a distinct set of annotated road crack images, comprising 628 samples. Subsequently, all additional metrics and results were assessed using a separate held-out validation set, which included 70 images.
Prediction examples:

Supervisely for Computer Vision
Supervisely is online and on-premise platform that helps researchers and companies to build computer vision solutions. We cover the entire development pipeline: from data labeling of images, videos and 3D to model training.
The big difference from other products is that Supervisely is built like an OS with countless Supervisely Apps — interactive web-tools running in your browser, yet powered by Python. This allows to integrate all those awesome open-source machine learning tools and neural networks, enhance them with user interface and let everyone run them with a single click.
You can order a demo or try it yourself for free on our Community Edition — no credit card needed!
Liked this blog post? Share it!


Subscribe to new blog posts
Table of Contents
🤖 Try Supervisely: it's free!
Full stack platform with hundreds of Apps ready to solve any computer vision task: from labeling to model training. Create account


