No-code tutorial: train and predict YOLOv8 on custom data

The easiest way to get custom YOLOv8 model trained on your own dataset and deploy it with zero coding in the browser.
Table of Contents
What's wrong with YOLOv8 training tools?
Before writing this tutorial I've tried a bunch of other guides from the first page of Google. While most of them are great posts explaining the basics of how to install YOLOv8 from pip and make it generate some results, they all have the same problems:
-
Most of your time you will spend writing some boilerplate code to install the model, convert your data, load weights, and so on, instead of focusing on machine learning.
-
You will need to switch between your terminal, IDE, file manager, multiple web platforms (say, annotation or MLOps) and so forth. What's worse, most of those tools are fragmented and it would be hard to integrate them.
-
You will be provided with Google Colab notebook or other platform, limited in some kind of Compute Units which will run out before you will get any meaningful results.
-
And, yeah, you will need to write code, which means debugging: lots of debugging.
But what if you could use your own PC with a video card (or AWS, or any GPU device for that matter)? What if you could do all the work in your web browser and write no code at all? What if you could use user-friendly interfaces with all features from the original repository integrated with data annotation and MLOps?
In this step-by-step guide and video tutorial, we will show you the solution for all the aforementioned challenges and you will learn the new and easy way to train, deploy and predict YOLOv8 model on your custom dataset without coding.
In addition, you will find the ready-to-use demo data so you will be able to reproduce all steps yourself. Also, you won’t need to spend a single cent — it’s 100% FREE, apart from many other tools which will require you to buy some sort of credits or cloud resources at some point. By contrast, in Supervisely to follow this guide you only need to connect your computer with GPU — and that's it!
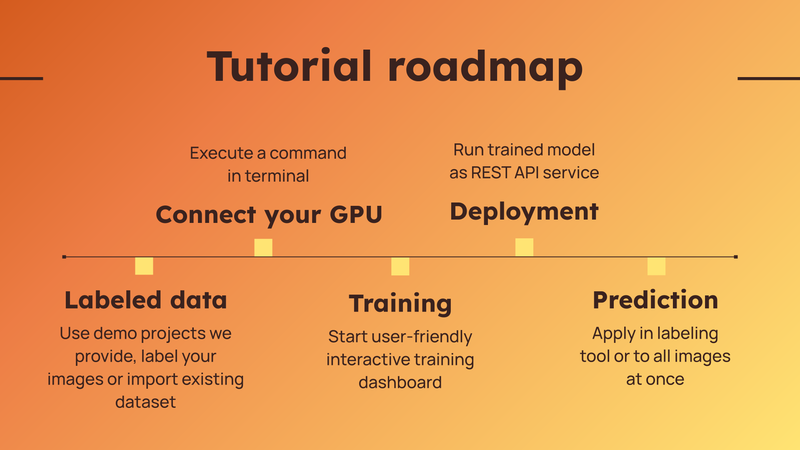 Steps covered in this tutorial
Full video tutorial
Check out the video tutorial on how to train the YOLO model on custom data and how to pre-label (get predictions) your images with the trained models. We will cover two inference scenarios - how to apply a custom model right inside the labeling interface during annotation and how to apply the model to all images in a project at once. Try it yourself in our Community Edition for free.
In this guide you will learn how to:
-
Prepare custom training data.
-
Train YOLOv8 on your computer with GPU.
-
Deploy or export trained weights.
-
Get predictions on your images and a bonus: tracking on videos 🎁.
What is YOLOv8?
YOLOv8 is a state-of-the-art neural network for computer vision tasks such as object detection, instance segmentation and pose estimation. It is designed to work fast even on edge devices in robotics and at the same time produces accurate predictions. It is a good choice and starting point for many computer vision applications.
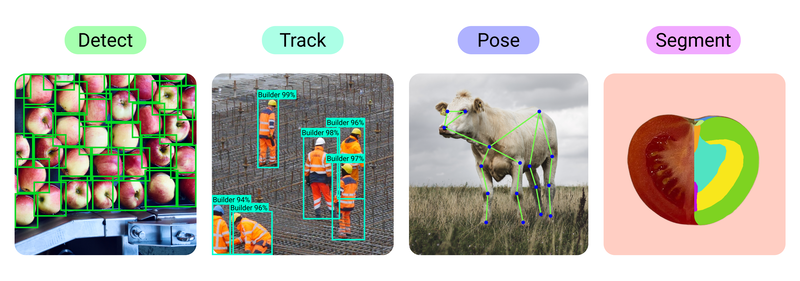 List of computer vision tasks, YOLOv8 supports
Real-world case - defects detection from drones
In our previous tutorial about labeling consensus, we showed how to manage the work of the labeling team. Today we will use that training dataset and build a custom YOLOv8 model to detect three classes: insulator objects and two types of defects on them: pollution flashover and broken. Data for this use case is taken from the Insulator-Defect Detection dataset.
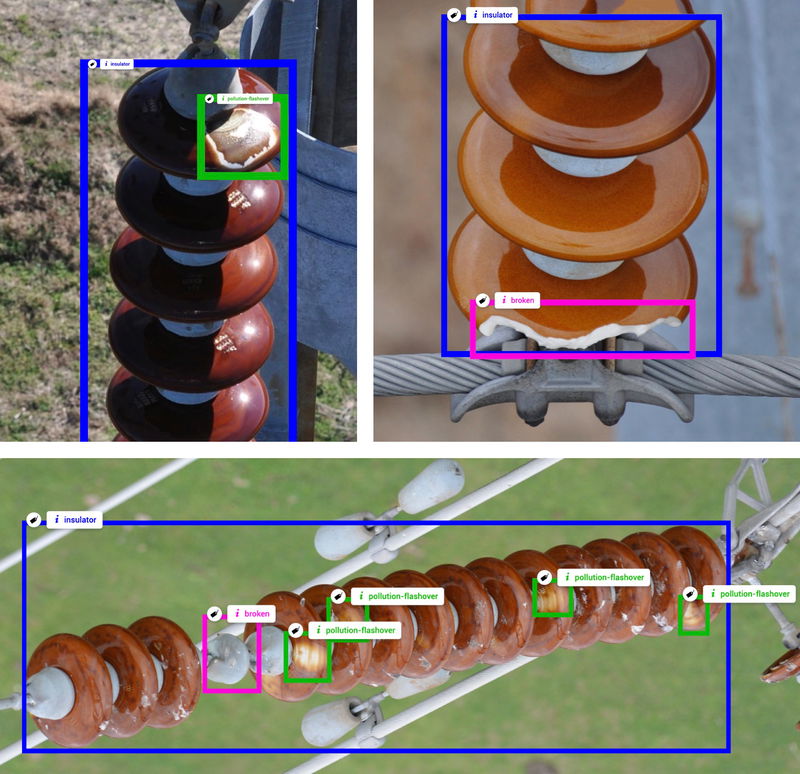 Examples of images labeled with three classes of objects: insulator, pollution flashover, broken.
Step 1. How to prepare training data
How much training data do you need for YOLOv8? 🤔
Of course, the famous rule is still actual: more data leads to more accurate models. However, it highly depends on your use case and the nature of the data. You don't need a lot of annotated images in your training data at the beginning in at least two cases. If the images look similar and are captured in some controlled environments and fixed conditions, like production belts, laboratories, with fixed camera position and type, similar lighting, etc. Or if the objects are simple and have little intra-class variation like vegetables, defects, plants, products on a production line, and so on.
We recommend to start experiments with several hundreds of images and then constantly improve your object detection neural network on edge cases by adding to the training dataset new images where the model is not so accurate enough.
Here we provide you with several options for this tutorial. You can:
-
Pick ready-to-use data we prepared for you and reproduce this tutorial from start to end.
-
Import your existing training dataset and try to build YOLOv8 model directly on your custom data
-
Upload your images, label them and, after that, train a custom YOLOv8 model.
Option 1. Ready to use demo data
We prepared the demo data so you can add two projects (train and test) to your account in a few clicks. So this data will help you to quickly reproduce the tutorial without a headache and get an experience and clear understanding of all steps in this tutorial.
Train dataset - Insulator-Defect Detection
For object detection tutorials
Test dataset - Insulator-Defect Detection
For object detection tutorials
Option 2. Import your existing training dataset
If you already have the labeled data — just upload it into Supervisely platform using one of the 70+ import Supervisely Apps from our Ecosystem. You will find there the imports for all popular data formats in computer vision. For example, here are just a few popular import Apps from Ecosystem:
Convert YOLO v5 to Supervisely format
Transform YOLO v5 format to supervisely project

Import images with masks
Import images with binary masks as annotations

Option 3. Upload and label your images in Supervisely
Or you can use Import images App to upload your data, create annotation classes and annotate the data with bounding boxes. Labeling process automation with your models will be covered in Step 5 of this tutorial.
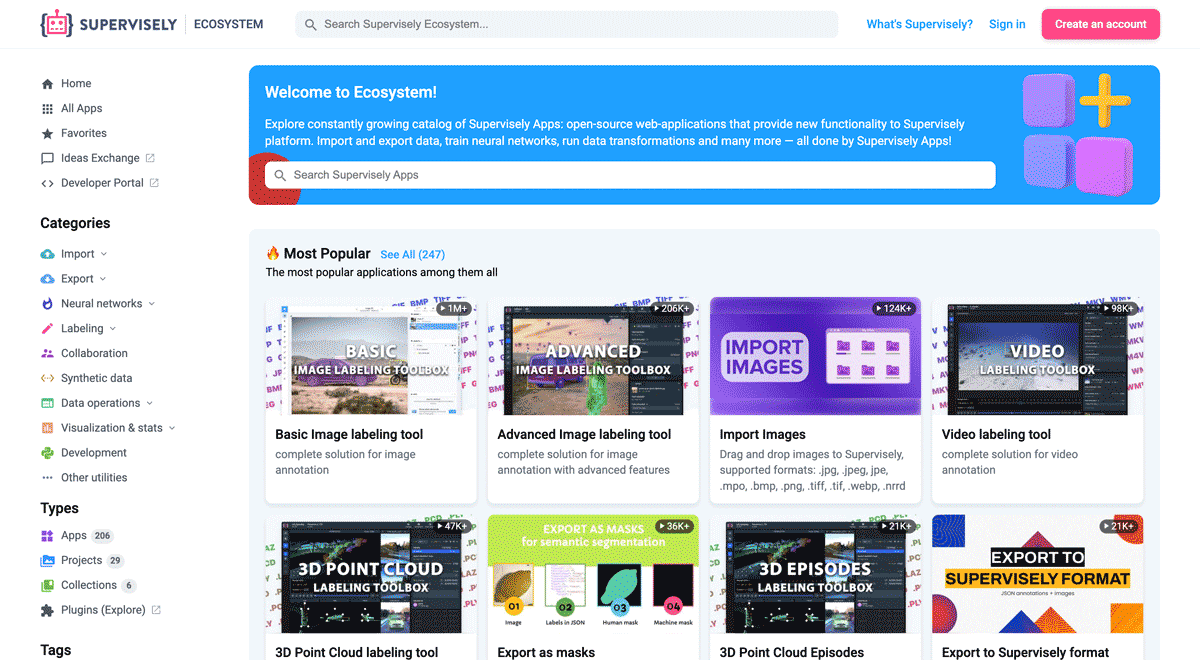
Import Images
Drag and drop images to Supervisely, supported formats: .jpg, .jpeg, jpe, .mpo, .bmp, .png, .tiff, .tif, .webp, .nrrd
Step 2. Connect your computer with GPU
Suppervisely allows you to connect your own computers with GPU to the platform and use them for model training, inference and evaluation ✨ for FREE. It is as simple as running a single command in the terminal on your machine.
-
No vendor locks. You can connect your computer from home, office or cloud.
-
Single command, no network configuration is needed.
-
Private, open-sourced, proven by the community: 🌎 1.5M+ docker pulls.
Here is the video instruction that explains in detail how to do that:
Step 3. How to train a model
Train YOLOv8 | v9 | v10 | v11
Dashboard to configure, start and monitor YOLOv8 | v9 | v10 | v11 training
Just run YOLOv8 from the context menu of the project with the labeled data you want to train on. Click the [⫶] button → Neural Networks → YOLO → Train YOLOv8 Supervisely App:
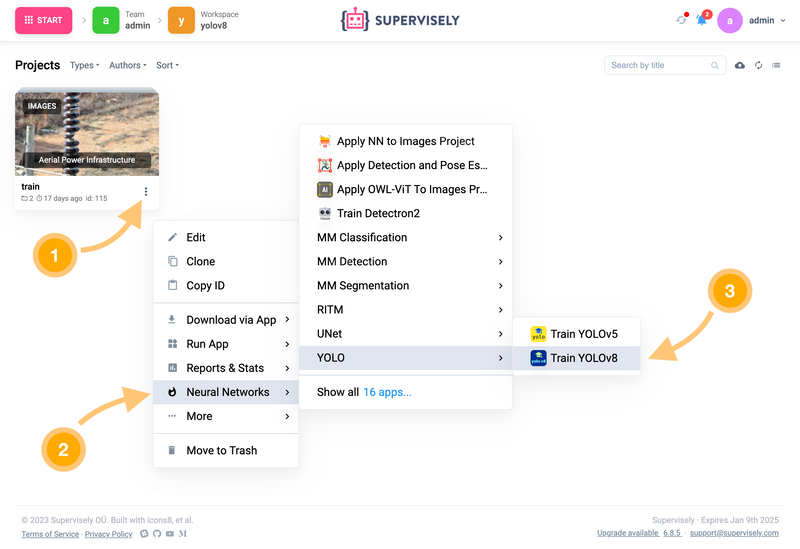 How to run the YOLOv8 training App from your custom training dataset
Follow the steps in the wizard to configure the main training settings that the original repository allows to do. More specifically you can choose all or a subset of classes for training, define train and validation splits, select one of the available model architectures and configure training hyperparameters including the augmentations. Check out more info in the video tutorial attached at the beginning of the guide.
Then just press Train button and monitor logs, charts and visualizations in real-time.
Training process generates artifacts including model weights (checkpoints), logs, charts, additional visualizations of training batches, predictions on validation, precision-recall curves, confusion matrix and so on. At the last step of the training dashboard, you will see the location and direct link where the resulting directory with training artifacts is saved.
 Training artifacts are saved to your account to Team Files
It is automatically uploaded from the computer used for training back to the platform to Team Files. You can find it there at any time.
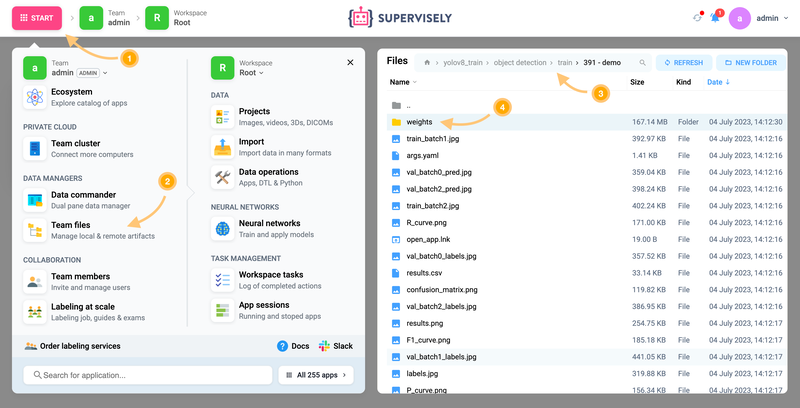 Training artifacts are saved to your account to Team Files
Step 4. How to deploy a trained model
Once the model is trained, you probably want to try it on your data and evaluate its performance. To do that, you need to run (deploy) your model as a service so it can receive images and return predictions in response.
In Supervisely you can quickly deploy custom or pretrained YOLOv8 model weights on your GPU using the following Supervisely App in just a few clicks. All you need is to provide a checkpoint — model weights file in .pt format. Watch how to do it in the video tutorial for this post or read the corresponding App Readme to learn more about model deployment.
Serve YOLOv8 | v9 | v10 | v11
Deploy YOLOv8 | v9 | v10 | v11 as REST API service
Few words about neural networks in Supervisely platform. Every NN framework is integrated in the form of two Supervisely Apps — train and serve. First one is an interactive training dashboard we used in the previous step. Second one is a serving App that allows you to deploy a model as a REST API service. It allows to send requests to the model from 🐍 python code or other inference applications from Supervisely Ecosystem that can send images and get model predictions back in response. Find more Apps on the Neural Networks page:
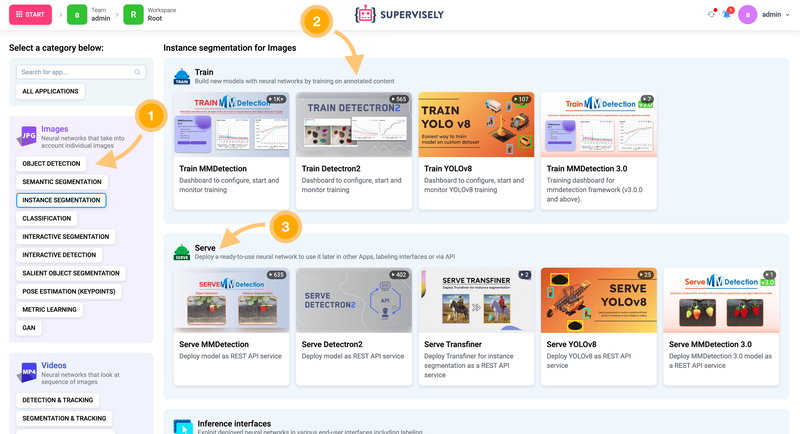 Neural networks page with training and serving apps for different computer vision tasks in all modalities
Step 5. How to get predictions
There are also a lot of various Apps for inference. In this tutorial, we will explain how to use two of them.
Option 1. Use in labeling tool during annotation

NN Image Labeling
Use deployed neural network in labeling interface
This Supervisely App will be embedded into the labeling interface and will allow you to apply any model to the entire image or to the selected region of interest, configure inference settings like confidence thresholds or select all or several model classes. This approach gives you the ability to automatically pre-label images and then just manually correct model mistakes. Therefore you significantly speed up the annotation process.
Also, there is one more possible outcome for data scientists — they can perform a visual analysis of model predictions on different images and scales to get more intuition about how the model works and potentially find some insights and edge cases that can improve the model in the future.
Option 2. Apply model to all images at once

Apply NN to Images Project
NN Inference on images in project or dataset
If you have thousands or even millions of images, you can pre-label them with your custom model all at once. Just run the App Apply NN to images project, and follow the steps in a wizard (connect to the model, select model classes, configure inference settings and preview predictions).
The App will iterate over all images in your project, apply your model in a batch manner and all predicted labels will be saved to a new project.
Step 6. How to export weights
The trained model can be easily exported and used outside the platform. Just go to the directory with training artifacts and download the weights in pytorch .pt format.
 Just download the trained model and use it outside the Supevisley platform
Now you can follow the YOLOv8 documentation to get predictions on images. Here is the Python example of inference:
from ultralytics import YOLO

# Load your model
model = YOLO("my_checkpoint.pt")

# Predict on an image
results = model("/a/b/c/my_image.jpg")

# Process results list
for result in results:
    boxes = result.boxes  # Boxes object for bbox outputs
    masks = result.masks  # Masks object for segmentation masks outputs
    keypoints = result.keypoints  # Keypoints object for pose outputs
Step 7. Bonus: tracking on videos
![]() Train model on images and then use it to track objects on videos
Train model on images and then use it to track objects on videos
There is another cool inference interface that allows you to track objects on videos using a custom object detection model trained on images. I recommend you to visit the application readme to learn more information about how to get YOLOv8 predictions and track objects.
Apply NN to Videos Project
Predictions on every frame are combined with BoT-SORT/DeepSort into tracks automatically
Here are the demo tracking results visualized in our video labeling toolbox:
Community feedback and achievements
Since we integrated training and inference of YOLOv5, our community users successfully trained more than 🚀 3.5K+ custom models.

We got a lot of positive feedback from the computer vision community and many requests to integrate the new version of this model — YOLOv8. We appreciate your support 🤝 and help in improving the user experience.
And today we are happy to announce to our community 🎉 the full-featured YOLOv8 integration for both training and inference pipelines.
Summary
In this tutorial, you learned how you can easily prepare training dataset, train and predict YOLOv8 model on custom data. You just need to use several applications from Supervisely Ecosystem to perform this process efficiently and save many days on integration, debugging and preparing the entire workflow for your custom model.
During this integration, we made contributions to the original repository by reporting some issues and fixing the bugs. So our users and the entire machine learning community can now work with easy-to-use interfaces designed for YOLOv8 models right in the web browser.
YOLOv8 integrated into Supervisely Ecosystem gives you the following benefits:
-
User-friendly web interfaces with all features from the original repository.
-
No integration, no coding, no debugging. Save time and focus on experiments and research.
-
Connect your GPU, train and get predictions in a few clicks.
-
Compatible with other ready CV tools for 🖼️ label → 🎓 train → 📊 evaluate loop in a single place.
Supervisely platform combines and connects different fragmented computer vision tools. All 🧩 250+ apps in Supervisley Ecosystem are open-sourced and seamlessly integrated with each other and enhanced with a friendly graphical user interface (GUI) without losing the features of original repos. They help data scientists to focus on building custom data workflows, conducting research and performing a lot of experiments in parallel playing with different model sizes and training hyperparameters without coding.
Therefore, companies, computer vision researchers and enthusiasts can solve various computer vision tasks like object detection, tracking, segmentation and pose estimation much faster by combining ready-to-use apps into custom pipelines.
Supervisely for Computer Vision
Supervisely is online and on-premise platform that helps researchers and companies to build computer vision solutions. We cover the entire development pipeline: from data labeling of images, videos and 3D to model training.
The big difference from other products is that Supervisely is built like an OS with countless Supervisely Apps — interactive web-tools running in your browser, yet powered by Python. This allows to integrate all those awesome open-source machine learning tools and neural networks, enhance them with user interface and let everyone run them with a single click.
You can order a demo or try it yourself for free on our Community Edition — no credit card needed!
Liked this blog post? Share it!


Subscribe to new blog posts
CTO and Founder at Supervisely, PhD in Computer Vision
Table of Contents
🤖 Try Supervisely: it's free!
Full stack platform with hundreds of Apps ready to solve any computer vision task: from labeling to model training. Create account


