
Animal Pose Estimation: Models, Datasets and How to Label Animals
 Lisa UspenyevaUpdated
Animal pose estimation finds keypoints on pets, livestock and wildlife. See which datasets and models exist, and how to label animal keypoints in Supervisely.
Animal pose estimation locates body keypoints, such as joints, ears and paws, on animals in images and video. It is harder than human pose estimation because every species has its own anatomy and labeled data is scarce. This guide covers datasets, models and how to label animals with keypoints in Supervisely.
For models that work on people and a full comparison (OpenPose, HRNet, ViTPose, RTMPose, YOLO pose), see Pose Estimation Models. To use the ViTPose model step by step, see the ViTPose tutorial. The labeling steps below use the image labeling toolbox.
What is animal pose estimation, and how is it different from human pose estimation?
Animal pose estimation determines the position of body parts in an image or video, like the human version. The differences make it harder:
| Human | Animal | |
|---|---|---|
| Skeleton | One standard layout (17 keypoints in COCO) | Differs by species |
| Data | Very large public datasets | Smaller, such as AP-10K with 10,015 images, 54 species and 23 families (paper) |
| Poses | Familiar range | Poses that people cannot do |
Accurate animal poses matter for animal tracking, behavioral analysis, species identification and migration studies. Applications include:
- Agriculture: monitoring livestock body pose and behavior for animal health.
- Wildlife: tracking and counting species in the field.
- Research: measuring movement and behavior.
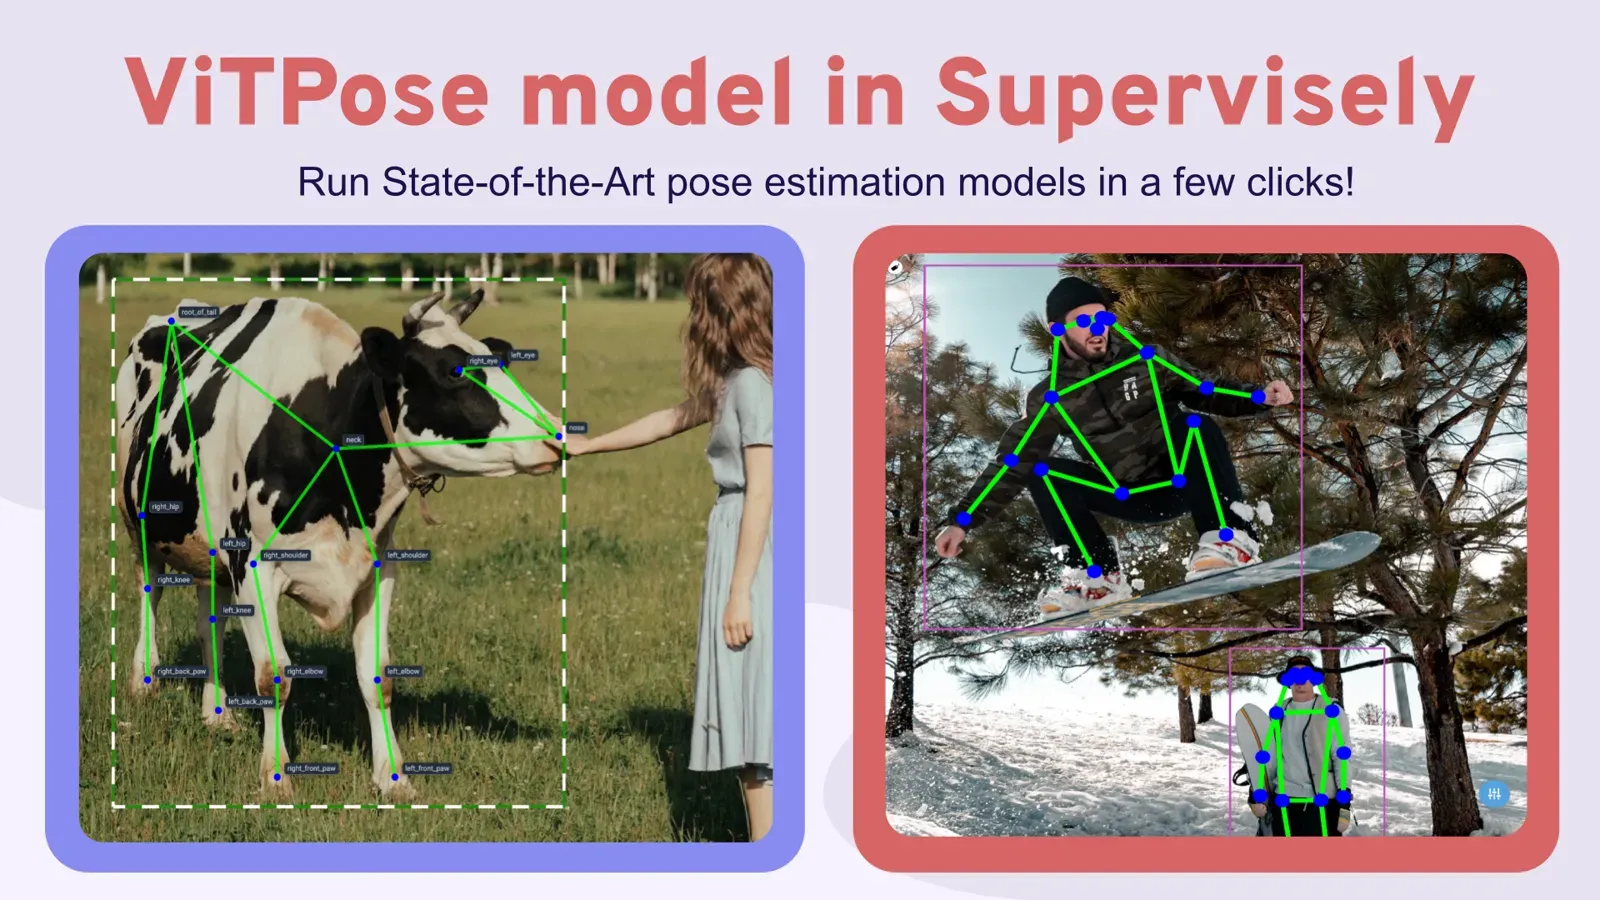
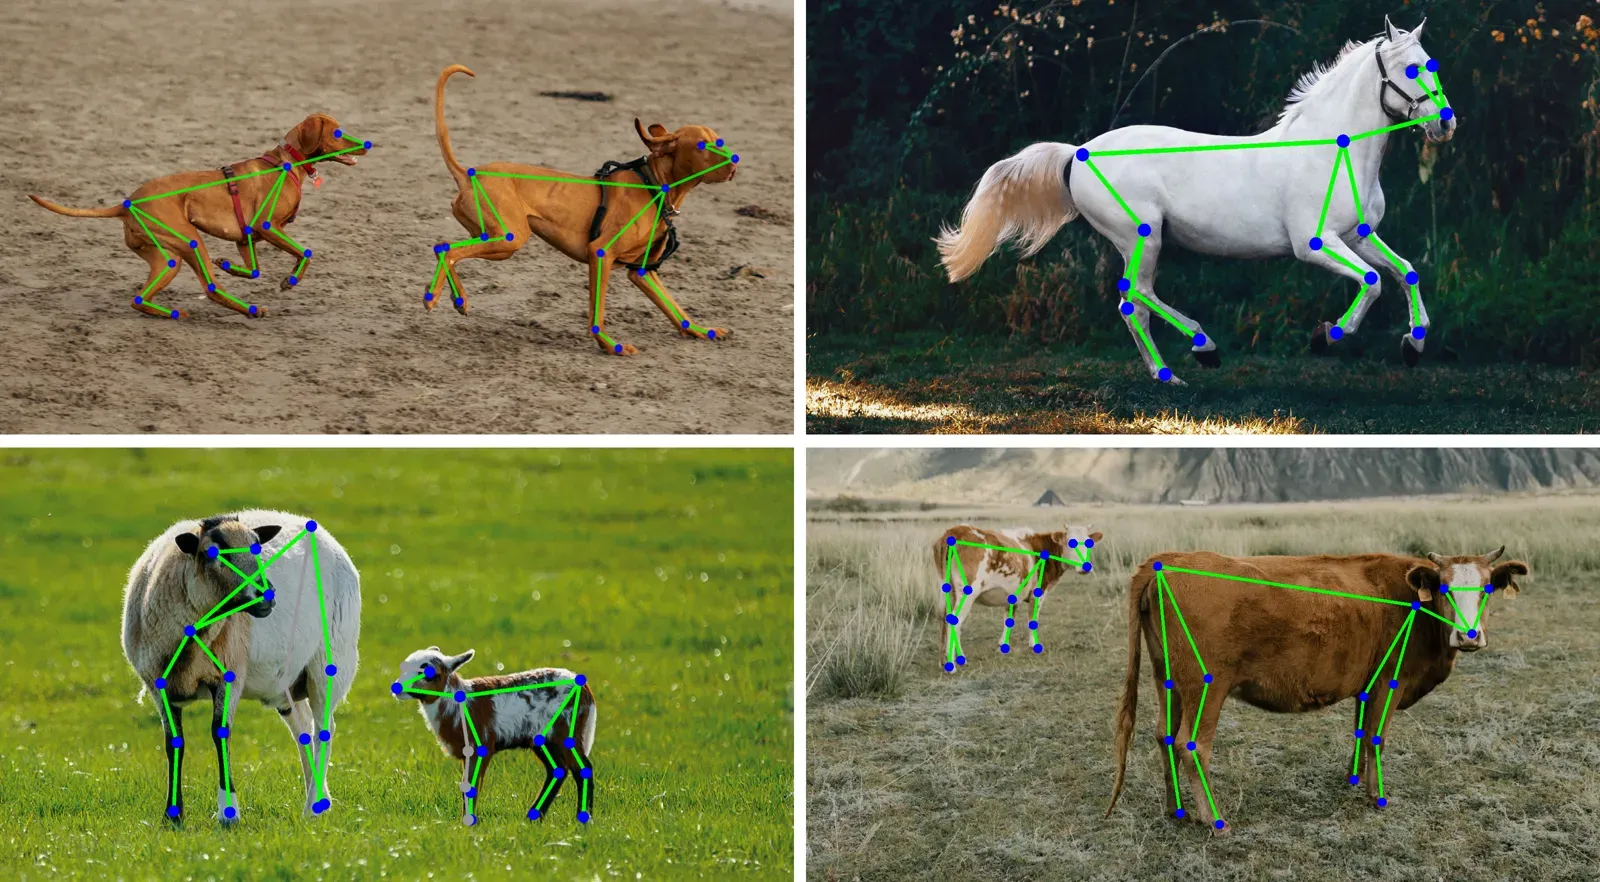 Example of animal pose estimation
Which animal pose estimation models and datasets exist?
The main public dataset is AP-10K. MMPose lists support for AP-10K and several other animal datasets. In Supervisely, the Serve ViTPose app offers four ViTPose+ checkpoints for animals:
| Checkpoint | Size | Pretrained | AP on AP-10K |
|---|---|---|---|
| ViTPose+ small | 177 MB | AP10K | 71.4 |
| ViTPose+ base | 559 MB | AP10K | 74.5 |
| ViTPose+ large | 1.72 GB | AP10K | 80.4 |
| ViTPose+ huge | 3.47 GB | AP10K | 82.4 |
Details on how these models work are in the ViTPose tutorial.
How to label animals with keypoints: video tutorial
In this video we demonstrate how to get most of the pose estimation tools in Supervisely. You will learn how to:
-
Create a keypoints class and build a skeleton to form a pose structure.
-
Use ViTPose model for animal pose estimation.
-
Easily annotate large datasets with just one tool, covering object detection and pose estimation in a single go.
How to label animal keypoints in Supervisely?
Detecting an animal's pose using the keypoints means identifying and labeling specific anatomical points on the animal's body to understand its current posture and position. These can be ear tips, tail tips, joints, and others.
We delve into the tools available in Supervisely for both manual and automatic labeling of animal poses.
How do you define a keypoint skeleton template? (Step 1)
Choose animal: Decide on an animal species for which you want to label the pose.
Create a keypoint shape class: You can either do this in advance in the Classes tab or from the labeling window.
Identify keypoints: Study the animal's anatomy and identify the keypoints that best describe the animal's pose. For example, for a cow, these might be points on the nose, eyes, ears, knees etc.
Arrange keypoints: To assist you in locating the points, you can upload an image of your selected animal. Start by adding keypoints to the appropriate places on the animal using the add note button and then connect them using the add edge button. Don't forget to name the points and save the class.
How do you label keypoints manually? (Step 2)
Start labeling the images: Place a pre-defined skeleton on the object. To do this, click once on the edges of the object.
Correct keypoints: Correct the existing points using Drag a point to move, Disable/Enable point and Remove point buttons so that they repeat the animal's pose.
Repeat these manipulations from image to image until you have marked all the data you need. Try to be as accurate as possible so that the keypoints accurately describe the animal's position.
⚠️ Remember that manually labeling an animal's pose using keypoints can be time-consuming, especially for complex poses and species. However, it also gives you more control over the results and allows you to more accurately describe the anatomical features of the animals in the image.
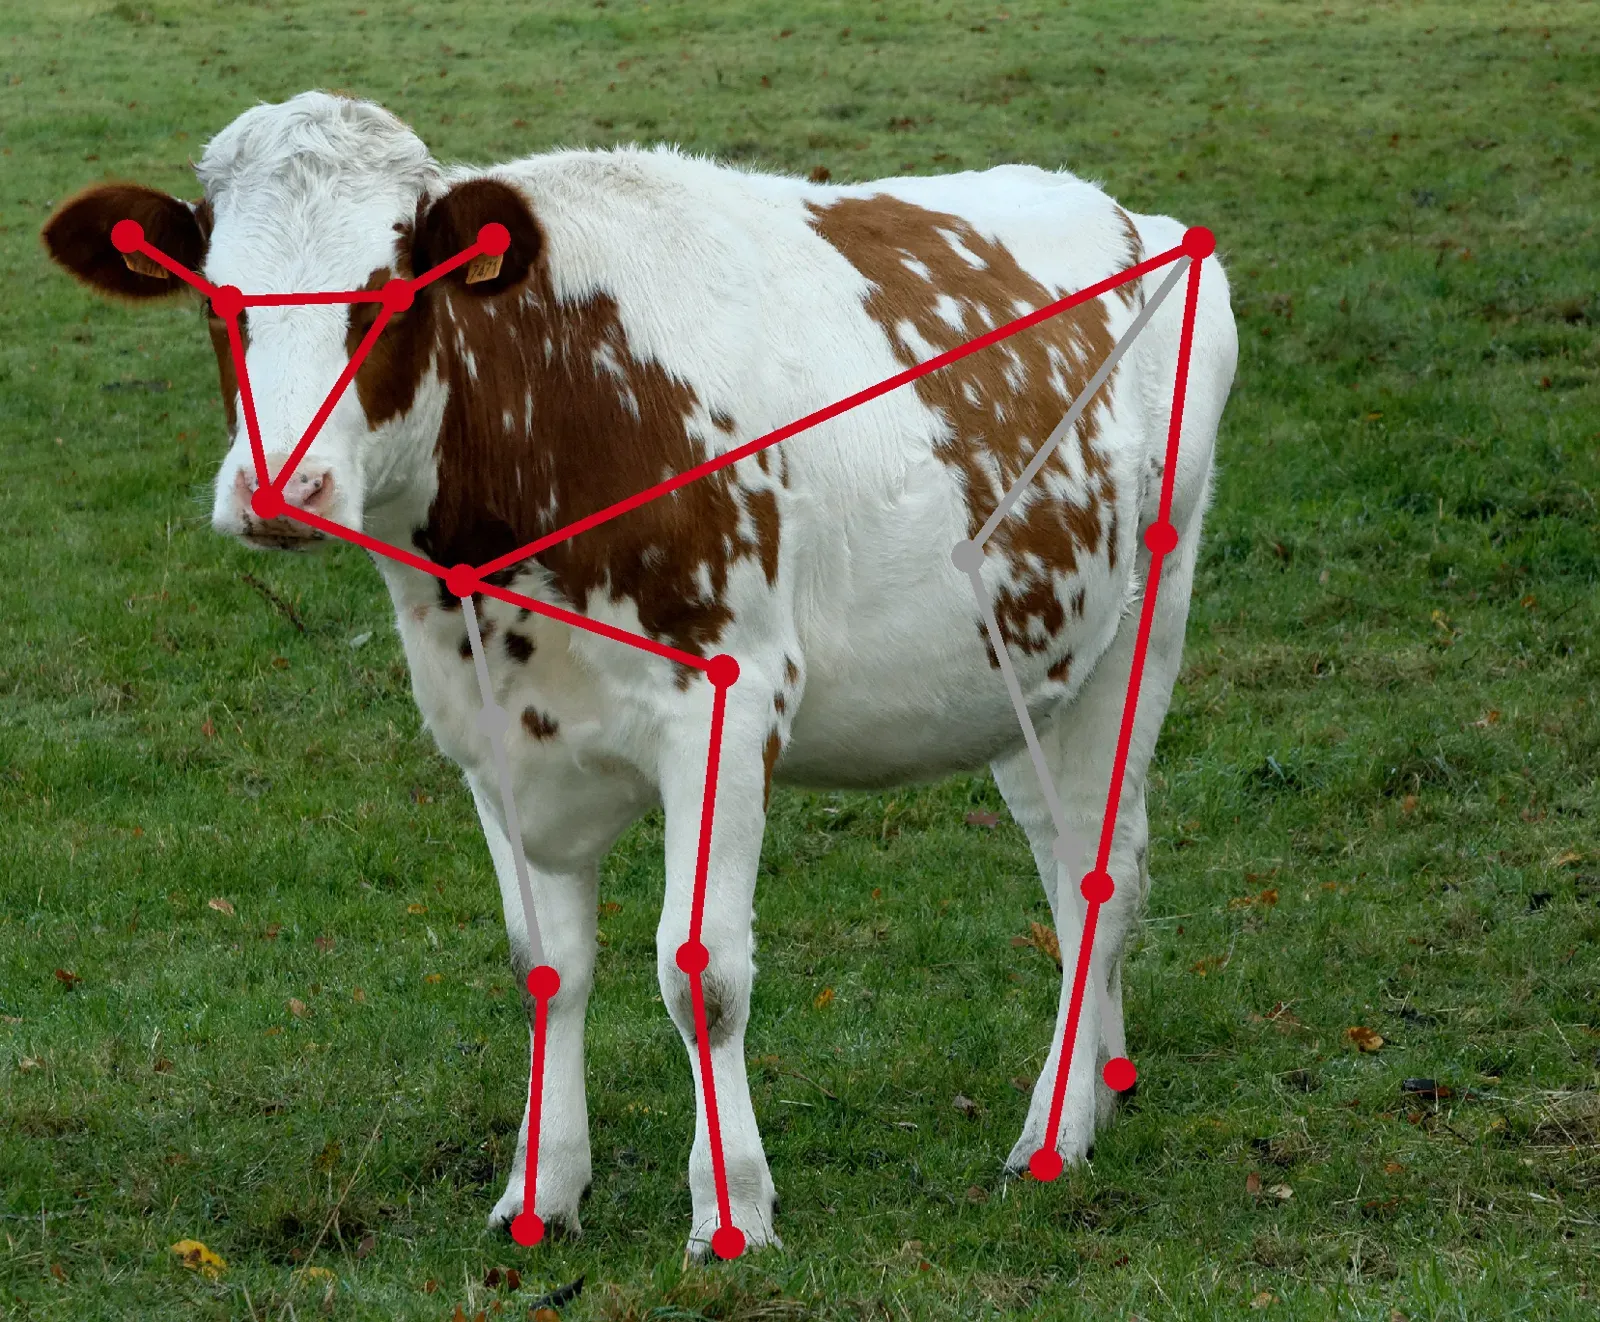 The gray line is connected to the concealed (non-visible) sections of the cow
How do you pre-label animals with ViTPose? (Step 3)
Read the ViTPose tutorial for how the model works. See also the docs for the Graph (Keypoints) tool.
Remember that to run GPU-dependent apps on your machine you need to connect a computer with a GPU to your Supervisely account. You can connect multiple computers for enhanced computational resources. Watch a 1.5-minute how-to video to learn more
Below are the steps on how to run VitPose it in Supervisely:

Run Serve ViTPose app. Go to Ecosystem page and find the app Serve ViTPose. Also, you can run it from the Neural Networks page from the category Images → Pose Estimation (Keypoints) → Serve.
Select pre-trained model ViTPose+ for animal pose estimation and the type of animal you're interested in, press Serve button and wait for the model to deploy.
⚠️ If you select a model for animal pose estimation, you will also see a list of supported animal species and basic information about the pitfalls of animal pose estimation.
Apply ViTPose to images in the labeling tool. Run NN Image Labeling app, connect to ViTPose, create a bounding box with the animal's type name, and click on Apply the model to ROI.

NN Image Labeling
Use deployed neural network in labeling interface
For the animal pose estimation task, you need to create a bounding box with the class name, which is presented in the list of supported animal species; keypoints skeleton class with the name {yourclassname}keypoints will be created. Otherwise, the keypoints skeleton class with the name animalkeypoints will be created.
Correct keypoints. If there is only a part of the target object on the image, then you can increase the point threshold in app settings to get rid of unnecessary points. Correct the existing points using Drag a point to move, Disable/Enable point, Remove point buttons so that they repeat the animal's pose.
How do you label a whole dataset with YOLOv8 detection plus ViTPose? (Step 4)
-
Follow the previous steps and run
ViTPose app. -
Run YOLOv8 app for detection:
Supervisely AppServe YOLOv8 | v9 | v10 | v11
Deploy YOLOv8 | v9 | v10 | v11 as REST API service
Go to Ecosystem page and find
Serve YOLOv8app. You can also run it from the Neural Networks page from the categoryImages→Object Detection→ServeChoose one of the pre-trained models and the
Object detectiontask type. PressServe buttonand wait for the model to deploy. -
Run the App "Apply Detection and Pose Estimation Models to Images Project:

Apply Detection and Pose Estimation Models to Images Project
Label project images using detector and pose estimator
Go to Ecosystem page and find the app Apply Detection and Pose Estimation Models to Images Project. Also, you can run it from the Neural Networks page from the category Images → Pose Estimation (Keypoints) → Inference interfaces. This App allows you to label images using Detection Model and additionally adds poses to bounding boxes using Pose Estimation Model.
Configure the App settings (for more details refer to the video tutorial)
Let's explore the outcomes achievable with our autolabeling pipeline. As evident, the model produces highly accurate results, automatically labeling even the poses of small and blurred animals with precision 😍
How to export keypoint data
Export images and/or annotations in Supervisely format

Export to Supervisely format
images or audio and JSON annotations
Download images, projects, or datasets in Supervisely JSON format. It is possible to download both images and annotations or only annotations.
Export only labeled items

Export only labeled items
Export only labeled items and prepares downloadable tar archive
App exports only labeled items from the project in Supervisely format and prepares a downloadable tar archive. Unlabeled items will be skipped.
Conclusion
Animal pose estimation needs a skeleton per species and has far less public data than human pose estimation. Start with a pretrained ViTPose+ checkpoint if your animals are four-legged, pre-label, and correct by hand. For people, see Pose Estimation Models. Supervisely runs in the cloud or on-premise, and you can try it free in the Community Edition.
Frequently asked questions
What is animal pose estimation?
Animal pose estimation is a computer vision task that locates body keypoints such as joints, ears, paws and tail tips on animals in images or video. It is used for livestock monitoring, wildlife research and behavior analysis.
How is animal pose estimation different from human pose estimation?
Humans share one skeleton and have very large public datasets. Animals differ by species, so each needs its own skeleton, and labeled data is much smaller. A giraffe, a goat and a beaver need three different skeletons.
What is the AP-10K dataset?
AP-10K is a public benchmark for animal pose estimation with 10,015 images of 54 species from 23 families, collected and filtered from the wild, with manually labeled and checked keypoints.
Which model can estimate animal poses?
ViTPose+ checkpoints trained on AP-10K work for many four-legged species. In Supervisely, the Serve ViTPose app offers four animal checkpoints, with 71.4 to 82.4 AP on AP-10K. MMPose also supports AP-10K and other animal datasets.
How do I label animal keypoints with my own skeleton?
Create a keypoint class, add points on the animal and connect them with edges, then place the skeleton on each image and correct the points. To save time, pre-label with ViTPose and review the result.
Do I need a custom skeleton for every species?
Usually yes for custom projects, because anatomy differs between species. For supported four-legged species the ViTPose app creates a skeleton class named after your bounding box class automatically.