Automate manual labeling with custom interactive segmentation model for agricultural images

How to speed up image segmentation in agriculture with custom AI models
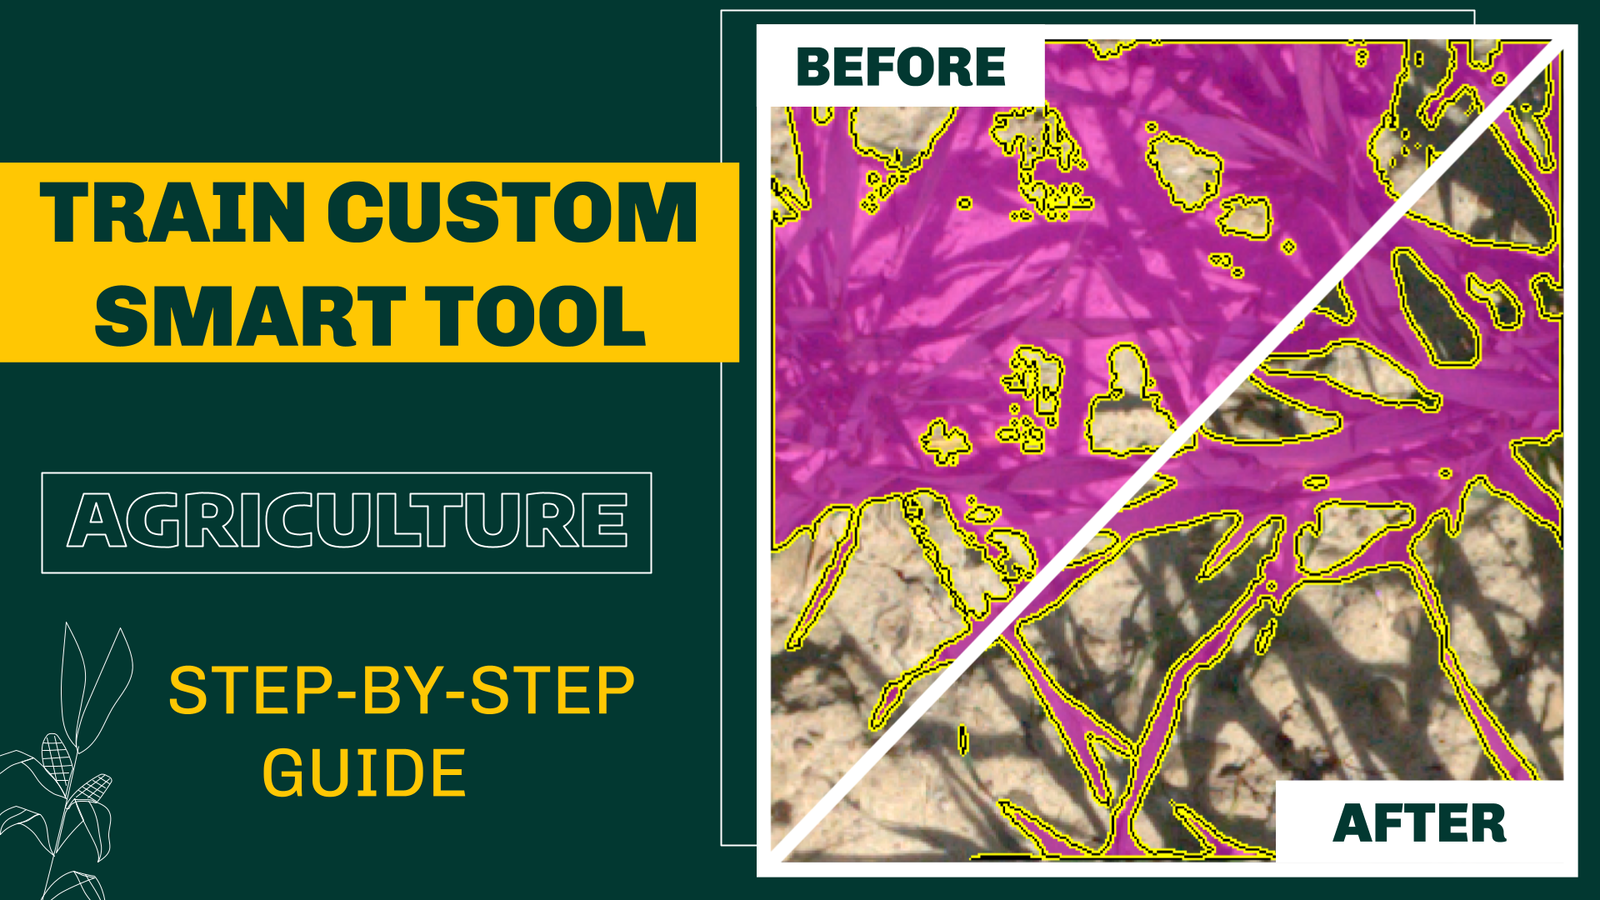
Table of Contents
Are you tired of relying on popular AI segmentation models that often fail to deliver exceptional results when applied to your specific production data?
Say goodbye to disappointment, as we guide you through the effortless process of building your own AI model with Supervisely - no coding needed! We'll tackle the challenging task of image segmentation, focusing on the intricate details of agricultural plants. Let's embark on this transformative journey together! 🏃♂️
Video tutorial
In this 12-minute video, we will:
-
Discuss semantic segmentation task applied to agricultural images.
-
Evaluate the performance of publicly available models for interactive semantic segmentation in the context of agriculture including
Segment Anything. -
Demonstrate how to train a custom Smart Tool in Supervisely without any coding, using your own data and GPU, in less than 15 minutes.
-
Conduct a comparison between the quality of AI-assisted pre-labeling using the standard Smart Tools versus the customized Smart Tool.
Try to reproduce this tutorial yourself in our Community Edition for free.
Use case: agricultural images of wheat plants 🌾
We will focus on a challenging case of semantic segmentation in agriculture, specifically the segmentation of plant images. 🌱
First things first, we need data.
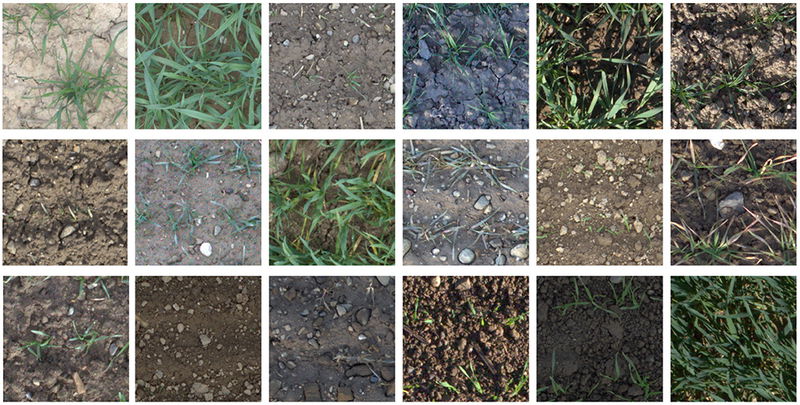
Data for this use case is taken from Research Collection published by ETH Zurich. The images pose unique difficulties with low-quality images, often accompanied by challenging lighting conditions, including shadows, making accurate semantic segmentation a demanding task.
We have set up demo data for you, allowing you to easily add two projects (train and test) to your account with just a few clicks. This data will enable you to follow the tutorial effortlessly, gaining hands-on experience and a clear understanding of all the steps involved.
Train dataset - Eschikon Wheat Segmentation (EWS)
Images of wheat for training and validation
Test dataset - Eschikon Wheat Segmentation (EWS)
Wheat images for test
In general, the amount of training data depends on the complexity and diversity of the objects you want to segment. For our use case, the training dataset comprises just 142 annotated plant images, carefully labeled with ground truth segmentation masks. These annotations serve as the reference for training custom models within Supervisely, enabling the learning of intricate plant structures under different environmental conditions.
To evaluate the performance of the trained models, a separate test dataset is employed. This dataset contains unseen plant images, presenting new variations in lighting conditions, perspectives, and other real-world factors.
 Test dataset
Additionally, a validation dataset consisting of 24 images is employed during the training process to fine-tune the models and assess their performance on unseen samples. The validation dataset aids in optimizing model parameters, ensuring the models achieve robust and accurate segmentation results.
Semantic segmentation of agricultural plant images: can we rely on out-of-the-box models for pre-labeling?
To build robust production models on real-life agricultural data, precise and accurate labeling of the data is crucial. However, this process can be time-consuming, leading us to explore a more efficient solution - AI-assisted pre-labeling using interactive image segmentation, where users initially click one point to segment the main body of the target object and then provide more points on mislabeled regions iteratively for a precise segmentation.
Let's investigate whether popular out-of-the-box models for interactive segmentation RITM, ClickSEG and Segment-Anything (SAM) can aid us in handling the data at hand 🤔.
As we can see, despite their popularity, these out-of-the-box models often struggle to effectively solve the challenging task of semantic segmentation in agriculture leading to incomplete or inaccurate segmentation, even with multiple inputs from the user 😔.
This highlights the need for a customized approach and specialized tools in platforms like Supervisely to overcome the limitations of generic models and achieve precise semantic segmentation in industry-specific domains like agriculture.
We'll demonstrate how to train an interactive AI segmentation tool in Supervisely, enabling efficient and effective image segmentation in less than an hour and without any coding.
Connect your computer with GPU
Supervisely allows you to seamlessly connect your own GPU-equipped computers to the platform for model training, inference, and evaluation, all for free! Just run a single command in your terminal, and you're ready to go. Check out this detailed video tutorial on how to set it up.
Model training tutorial
Training custom models in Supervisely is easy. In this tutorial, we will train an interactive image segmentation model where users click on one point to segment the main body of the target object and then provide additional points on mislabeled regions (red and green points) in an iterative manner to achieve a more precise segmentation. In our example, we will use RITM model because it is easy to train on small datasets and it predicts accurate masks.
Train RITM
Dashboard to configure, start and monitor training
Run Train RITM from the context menu of the project with the labeled data you want to train on. Click the [⫶] button → Neural Networks → RITM → Train RITM Supervisely App:
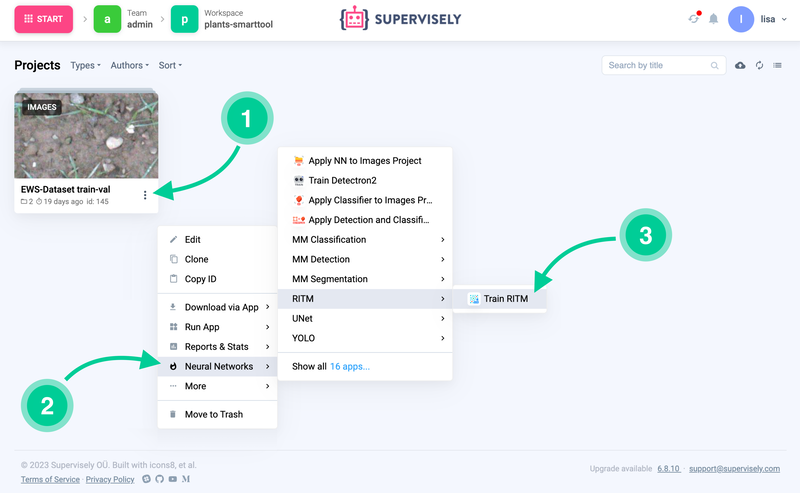 How to run the RITM training App from your custom training dataset
To begin the training process, follow the steps in the wizard to configure the main training settings available in the original repository, including selecting classes for training, defining train and validation splits, choosing a model architecture, and setting training hyperparameters, such as augmentation scenarios, pre-trained model selection, number of epochs, batch size, number of workers per GPU, checkpoints interval, visualization interval, and optimizer parameters like learning rate. Refer to the video tutorial for more detailed information.
After completing the configuration, simply press the Train button and monitor the real-time logs, charts, and visualizations during the training process.
When the training is progressing well, the visualizations should exhibit certain characteristics:
-
The learning rate chart shows a gradual and smooth decrease, ensuring stable model convergence.
-
The training loss curve decreases over time, indicating that the model is effectively minimizing its error.
-
The validation adaptive IoU precision chart showcases an upward trend, indicating that the model's predictions align closely with ground truth labels, thus improving its accuracy:
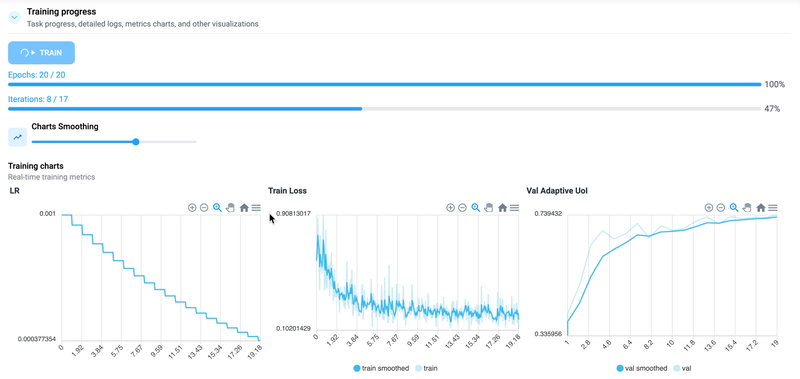 Training vizualisations
The training process will depend on the GPU connected; in my case, it will take several (up to 15) minutes.
Upon completion of the process, you will be prompted to either extend the training for an additional 5 epochs or finish the training. Considering the graphs that illustrate the training process, we are satisfied with the quality of the results, and thus we can opt to finish the training.
The training process produces various artifacts, such as model weights (checkpoints), logs, charts, visualizations of training batches and predictions. This link to the directory with artifacts can be found on the training dashboard.
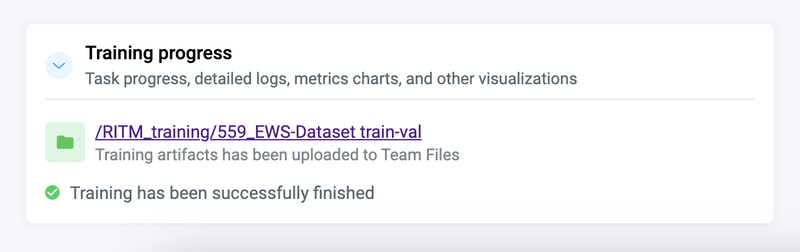 Model predictions are saved to your account to Team Files
During the model training process, checkpoints are saved every 5 epochs, providing access to the different model states over time. The system automatically saves both the last checkpoint and the best checkpoint by default. This facilitates further examination and evaluation of the training progress and performance.
Serve (deploy) your custom model
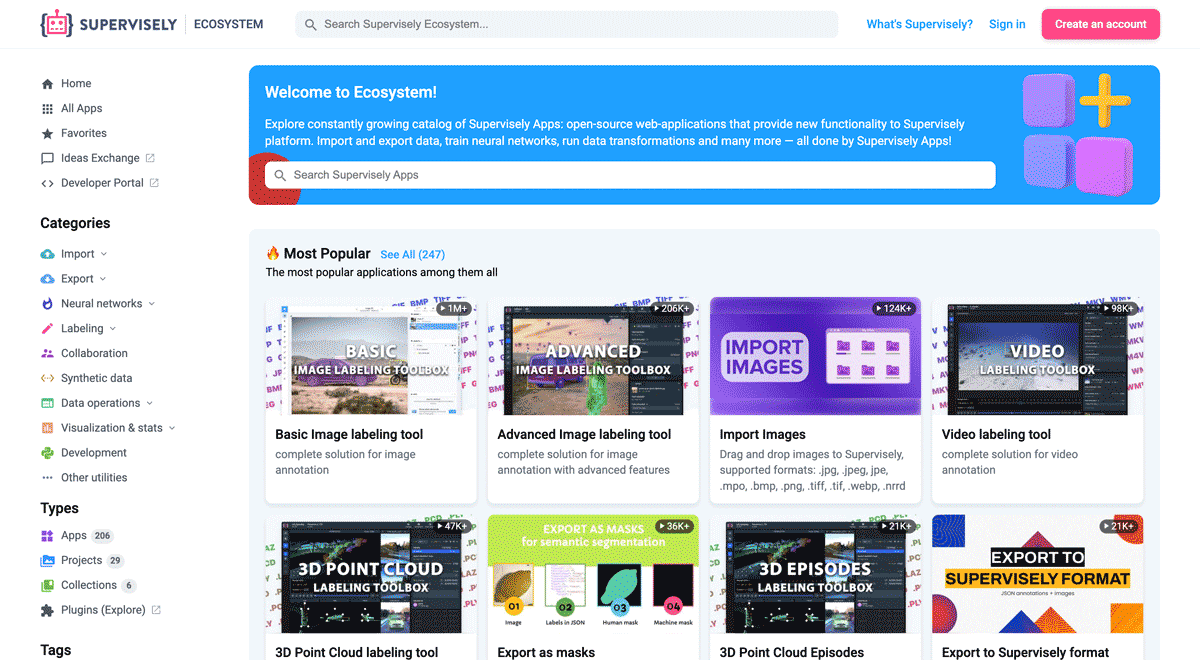
In Supervisely platform, Neural Networks are seamlessly integrated through two types of Apps: train and serve. The train App is an interactive training dashboard, as mentioned in the previous step, while the serve App enables users to deploy a trained model as a REST API service. With this integration, Python code or other inference applications from the Supervisely Ecosystem can easily send images to the deployed model and receive model predictions in response. For more available Apps related to Neural Networks, visit the Neural Networks page.
Now that we have a model trained on our custom data, the next step is to serve it, which involves making the model accessible and ready for use in Supervisely.
Let's navigate to Neural Networks → Images → Interactive Segmentation → Serve RITM Supervisely App:
 How to run the RITM serving App
We'll provide the path to the best checkpoint achieved during training (in our case, checkpoint 19) and assign the model a recognizable name, such as custom-wheat-smtool. After selecting the deployment device and clicking run, the Serving app will download the checkpoint to the designated device. Voila! 🌟
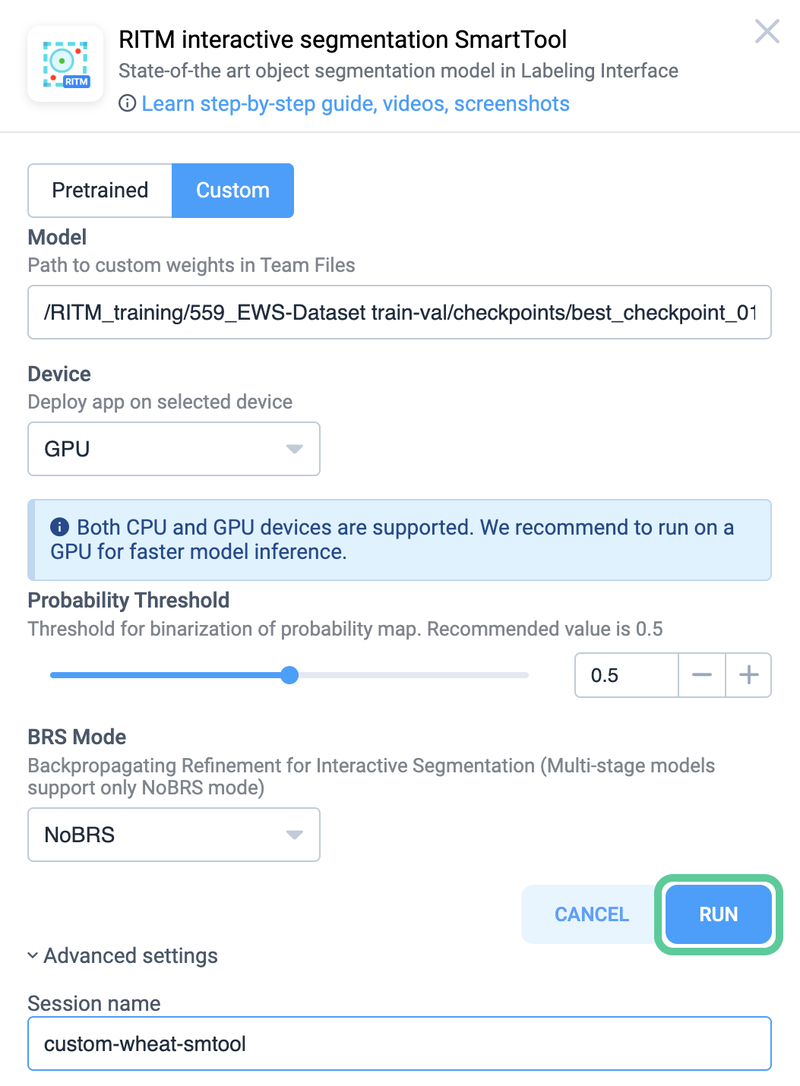 Provide a custom checkpoint you want to run
Time to check the results 💥
Let's access the test dataset and add a new annotation class called "wheat".
Within the Smart Tool selection window, you'll notice the available options: standard and custom. With just a single click, we can switch between different models and compare the performance of the model using these options.
Impressive results!🤩
To enhance the precision of the predictions even further, we can simply add more positive 🟢 and negative 🔴 dots by interacting with the tool.
Conclusion
In this post, we have explored the journey of leveraging AI-assisted labeling for image segmentation in Supervisely.
By customizing our approach to meet specific data requirements, we successfully overcame the limitations imposed by generic models. Focusing on the use case of semantic segmentation in agriculture, we addressed the challenges of accurately segmenting plant images. By training custom models and utilizing Supervisely's specialized tools, we achieved precise semantic segmentation in the agriculture use case.
The training process involved creating and fine-tuning datasets, selecting and configuring models, and optimizing training hyperparameters. We observed the progress through informative visualizations, and upon completion, we were able to serve the trained model for practical use.
Overall, this journey demonstrated the transformative power of customization and showcased the impressive results achieved through tailored AI-assisted labeling.
Supervisely for Computer Vision
Supervisely is online and on-premise platform that helps researchers and companies to build computer vision solutions. We cover the entire development pipeline: from data labeling of images, videos and 3D to model training.
The big difference from other products is that Supervisely is built like an OS with countless Supervisely Apps — interactive web-tools running in your browser, yet powered by Python. This allows to integrate all those awesome open-source machine learning tools and neural networks, enhance them with user interface and let everyone run them with a single click.
You can order a demo or try it yourself for free on our Community Edition — no credit card needed!
Liked this blog post? Share it!


Subscribe to new blog posts
Table of Contents
🤖 Try Supervisely: it's free!
Full stack platform with hundreds of Apps ready to solve any computer vision task: from labeling to model training. Create account


